Easy Facial Rig in ZBrush with Face Tools (4/4): Animated Demo
A Step-by-Step Guide from ZBrush Master Pablo Munoz Gomez

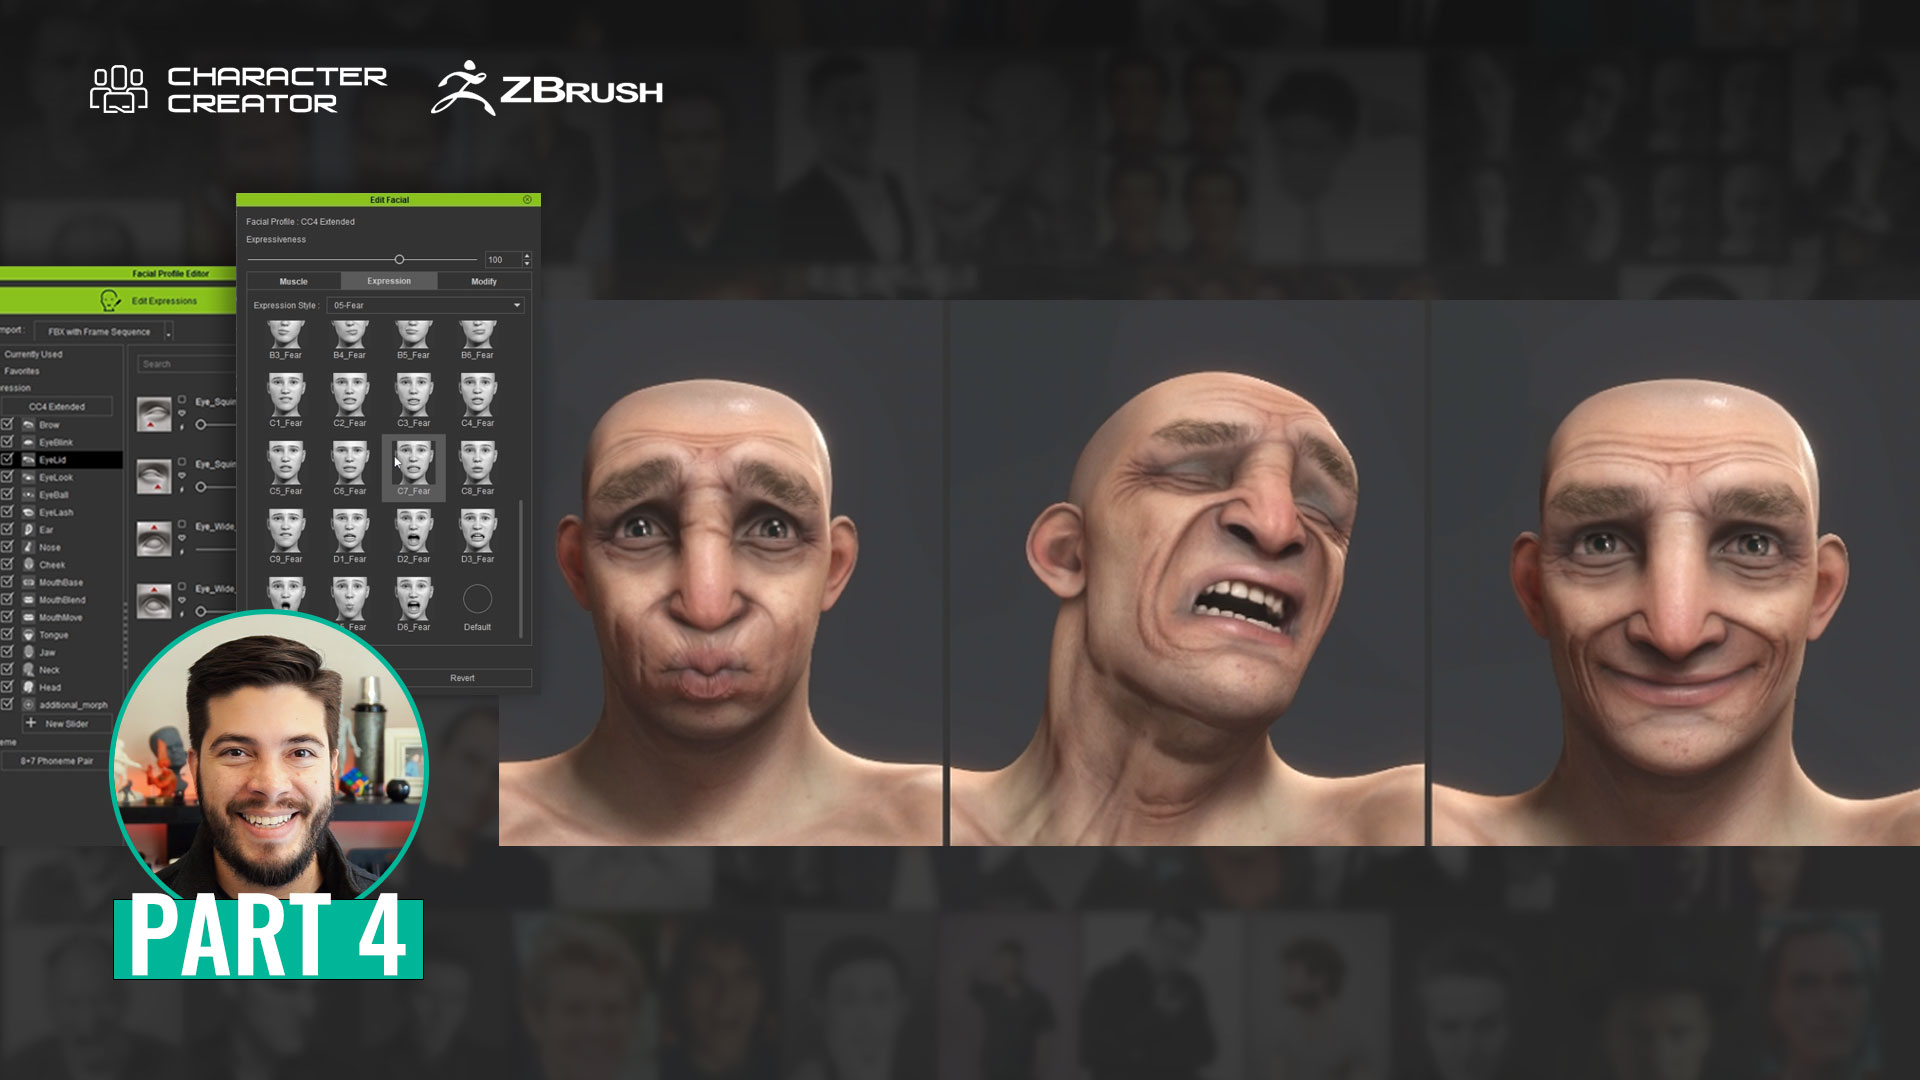
The Facial Profile Editor
Alright, to wrap up this in-depth guide to the Face Tools plugin, I want to give you an overview of one of the most powerful features in CC4 when it comes to expressions: The Facial Profile Editor.
With the workflow we’ve been following in this guide, we manage to create an original custom character with its unique set of expressions and of course unique wrinkles. However, all of the custom tweaks we’ve created are being applied to the generic rig in CC4, this means we can definitely generate some really cool and interesting expressions like these 3 main expressions I wanted to achieve:

But what takes this whole process to the next level is the Facial Profile Editor. Since no one set of expressions is the same just like no human is the same, the Facial Profile Editor allows you to tweak the generic rig and truly customise the expressions of any given character.
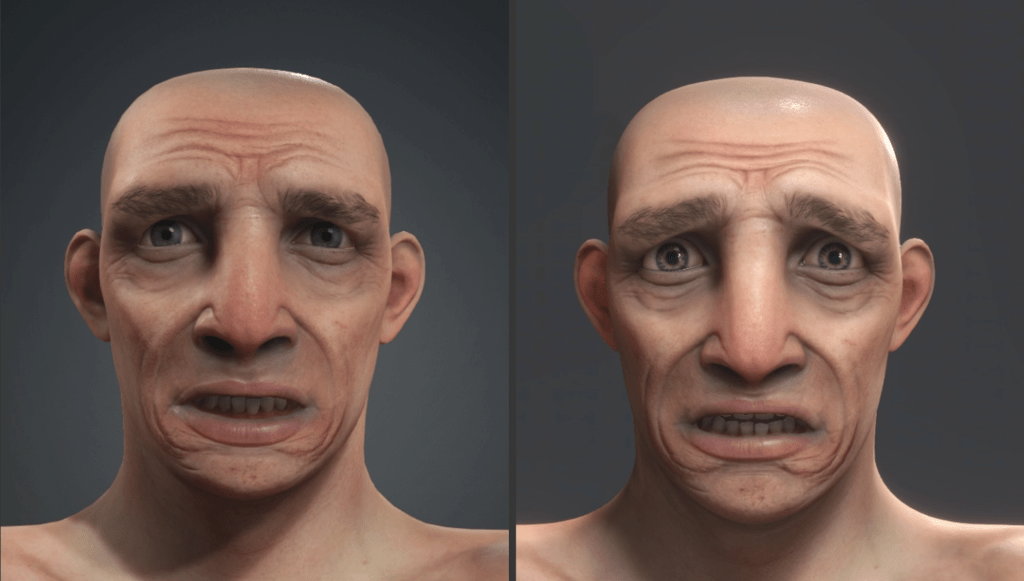
To illustrate this idea, here are my final expressions for this tutorial. The images on the left-hand side show the custom expression morphs and custom dynamic wrinkles and the images on the right show the exact same expression with the adjusted facial profile for this specific character:
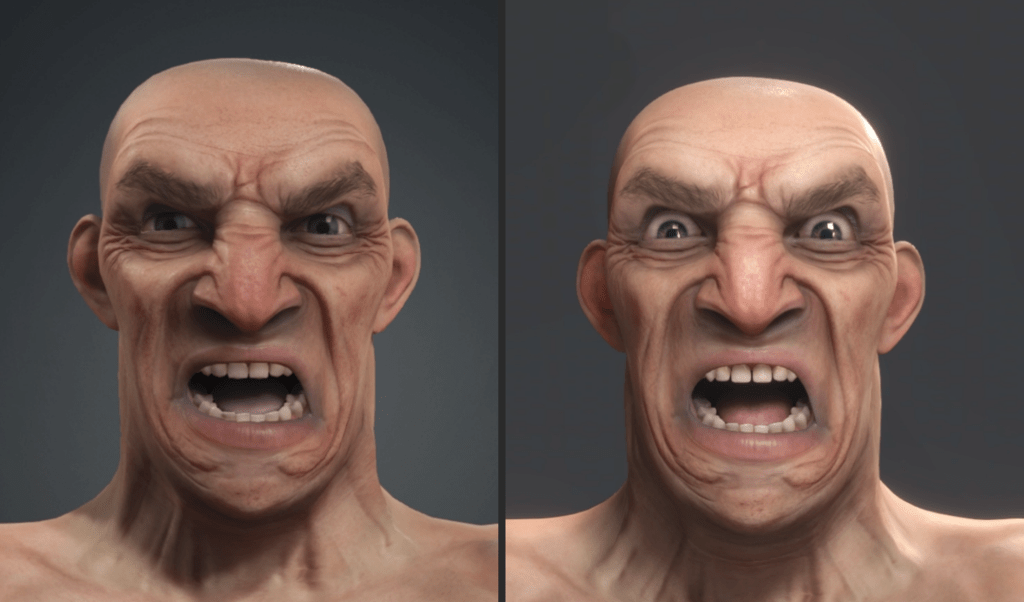
In the ‘evil laugh’ expression for instance, you can also see a massive change on how low the character’s eyebrow can go and how exposed the bottom teeth are as well:

Here is the fear/surprised expression, also with the updated facial profile:
The point is, that the generic rig of CC4 can get you 90% of the way. As soon as you start working with more stylised or custom character, the Facial Editor will help you tweak and adjust all aspects of the morph sliders to creating convincing expressions:

Adjust Expressions in Edit Facial Panel
To get started with the Facial Profile Editor, I like to check my expressions and dynamic wrinkles from the Edit Facial control window. This is probably the easiest way to see how everything works and to spot areas of the expression that could be improved.
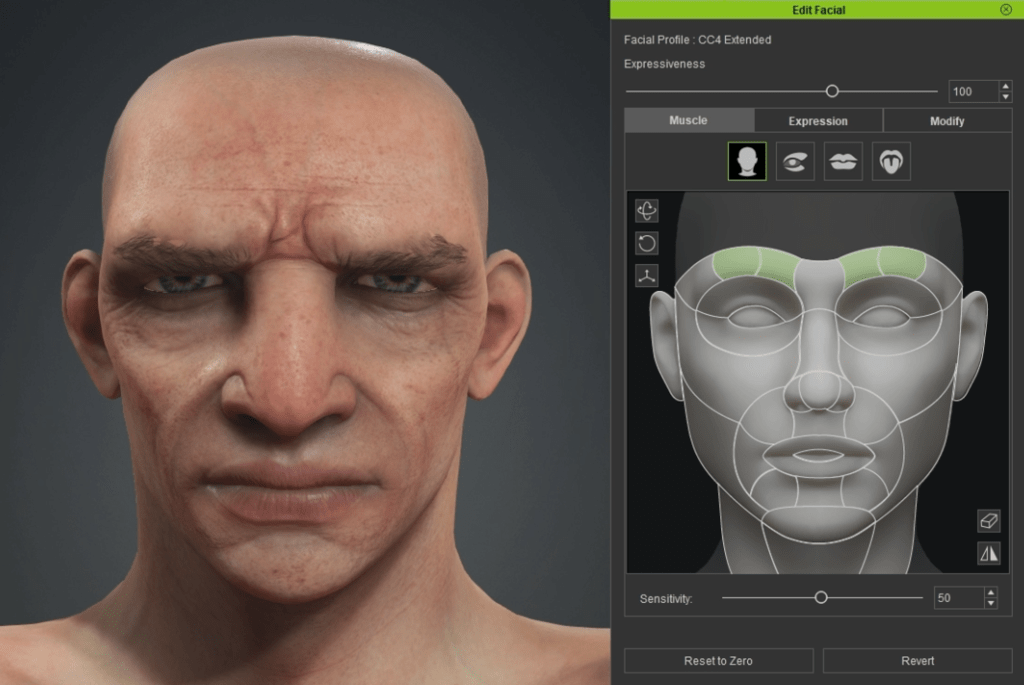
From the Edit Facial window, you also have other tabs next to Muscle. For instance, the Expression tab gives you access to a bunch of pre-made expressions that you can use as a starting point. These templates can give you a reference of how much you need to tweak your Facial Profile so you get to a more authentic expression.

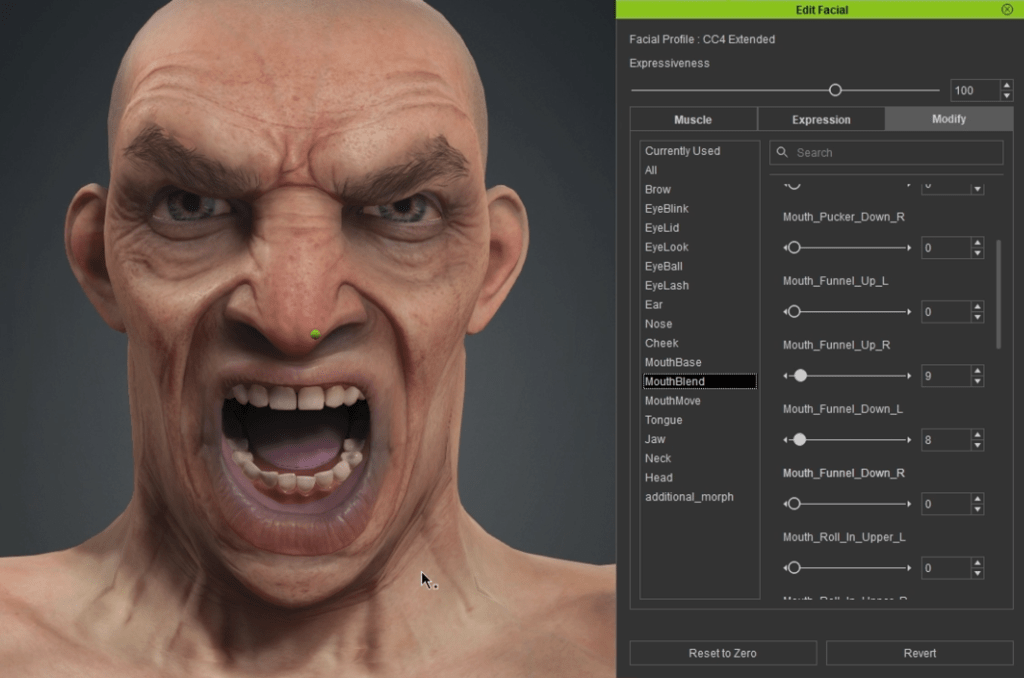
The third tab called Modify is actually very useful. It gives you a much more granular control over each portion of the expression. So just as a quick example, here is the same ‘Angry’ Expression from above but with some of the sliders in the Modify tab tweaked (exaggerated opening of the mouth, angled brows, etc).
Now let’s dive into the Facial Profile Editors so we can create more custom expressions for the character.
Create More Custom Expressions in the Facial Profile Editor
From the Modify window, click on the Facial Profile Editor button. The character would go back to a neutral expression:

From the Facial Profile Editor, you’ll see all your morphs to the left of the window. After selecting a morph, you can see the different sliders you have to tweak that part of the expression
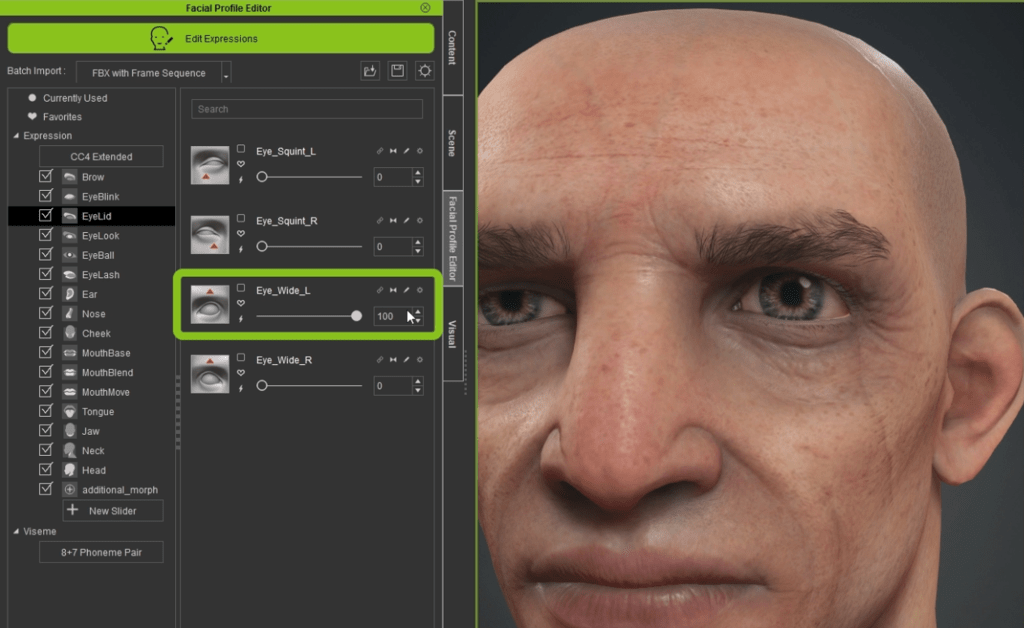
In my case, you’ll notice that even with the ‘EyeLid’ selected, pushing my ‘Eye_Wide_L’ slider all the way to a value of 100 doesn’t significantly open the character’s eye (partly due to the exaggerated size of my pupils).
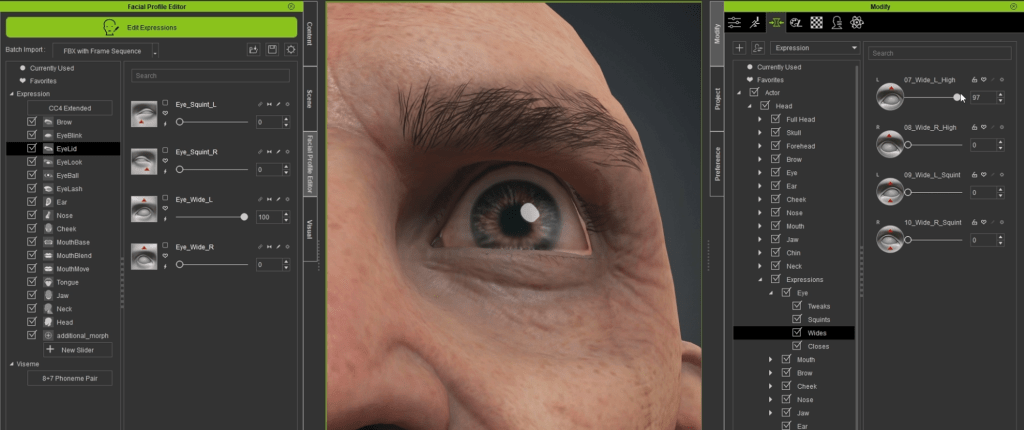
The idea here is to fine-tune this particular slider using the Modify tab. Firstly, from the Morph tab of the Modify window, I located the morph section corresponding to my eyelid:
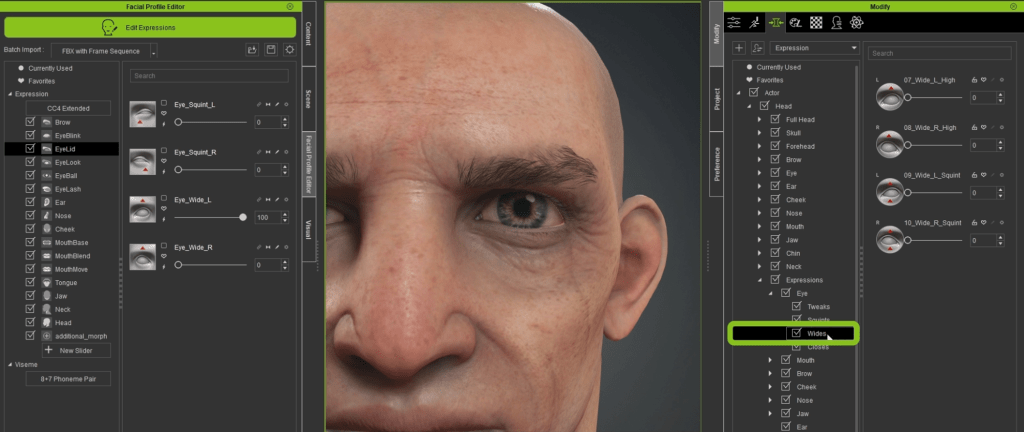
Then I used the ‘07_Wide_L_high’ to push that top eyelid past the edge of the iris of the character; this is how you can truly customise your expressions.
Now, in order to apply this change to my facial profile, I need to click on the tiny ‘thunderbolt’ icon next to the slider in my Facial Profile. In the pop-up window click on Ok. You can apply it to the current slider or to split part (I prefer to use the current slider and manually mirror the effect).

The mirroring process is just a matter of clicking the ‘mirror’ arrows icon from the opposite slider, ‘Eye_Wide_R’:

These are the main steps of the process to adjust your expressions in the Facial Profile editor. After you do a couple, it is just rinse and repeat. Here is an example of the exaggerated left eyebrow raised:

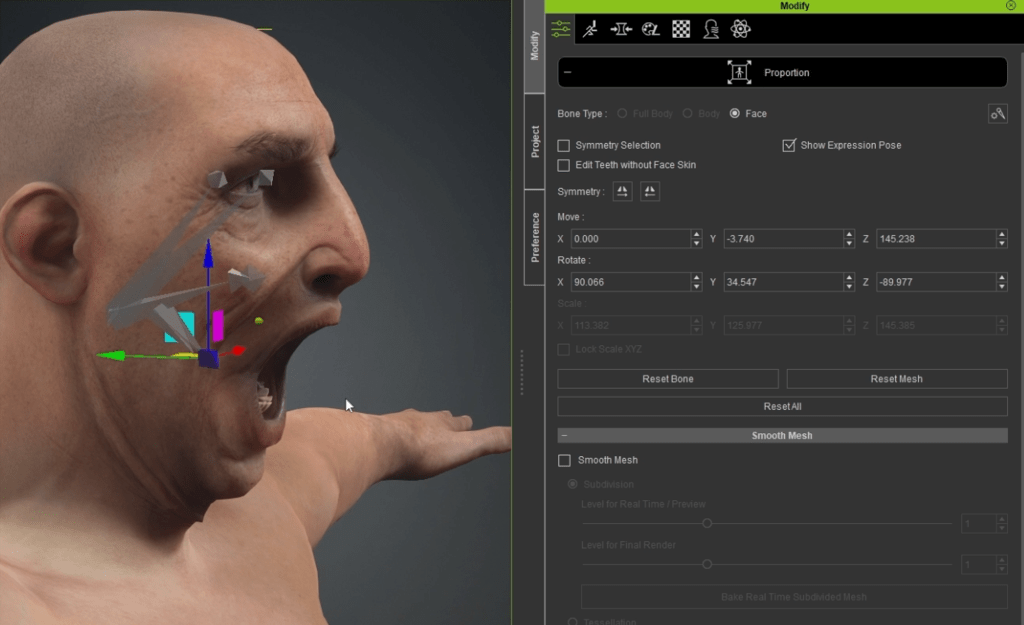
Another significant advantage of editing your profile is the ability to adjust the placement of facial elements (such as teeth, eyes, tongue, etc.) based on the expression. For example, when my character opened its mouth, the lower teeth were pushed back too far. To rectify this, you can utilise the Facial Profile Editor by clicking on the Proportion button (the fourth one in the Expression tools section):

This will display the bones associated with the face meshes and you can just click on them and move them around. In my case, I selected the bottom teeth and pushed them forward a bit while the jaw was down. The idea is that after adjusting this, the teeth will slide a tiny bit forward as the character opens the mouth:
That’s it in terms of the Facial Profile Editor. You can spend as much time as you need to in this step to further tweak each expression. But, in general, there will only be a couple very specific sliders that need tweaking, unless you really want to stylise your expressions.
The final aspect I’d like to demonstrate regarding the Facial Profile Editor is the capability to create your own custom sliders and incorporate them into your profile. These sliders could represent the effect of a single area of the face, such as ‘Super High Brow,’ or they could encompass multiple sliders to form a custom slider representing a complete expression.
Here’s a quick example where I utilised several sliders from the facial profile to generate this random expression:

Then, at the bottom of the expression morphs, I clicked on the New Slider button. A window will pop up where you name your slider and save it within a category. I named mine ‘WeirdLook’ (yep, I’m aware of the type-o in the screenshot). You can even upload a bitmap thumbnail with the expression so you know what the slider does.

Once you click OK, you’ll have your new slider in the custom category at the bottom of the expression morphs list:

You can now click on the big Edit Expression green button at the top to get out of the Facial Profile Editor and all your changes will be saved into your character. One last thing I like to do is test the full range of my expressions and dynamic wrinkles after I adjusted my facial profile using the animations that come with CC4.
From the Animation window, you can click on the Motion dropdown and go to Facial Rig > Extended Linear (or similar) to load an animation to test the expressions:

Here is a snippet of what the animation does for checking the expressions:

And finally with all the tweaks on my Facial Profile, here are my final CC4 renders showing the 3 expressions I set to create with this tutorial series:


About The Author

Pablo Munoz Gomez is a renowned 3D concept and character artist, with a passion for education. 3D sculpting, visual development, and other mixed-media form the pillars of his artistic passion which he channels through the various platforms that he owns, including ZBrush Guides, 3D Concept Artist Academy, and 3D Snippets Project. Thanks to his vast online following, he is able to reach artists from around the world and help them advance in a variety of 3D-related disciplines.

Read More
Easy Facial Rig in ZBrush with Face Tools (1/4): Concept & Setup
Easy Facial Rig in ZBrush with Face Tools (2/4): Detailing & Polypaint
Easy Facial Rig in ZBrush with Face Tools (3/4): Expressions & Wrinkles


