Easy Facial Rig in ZBrush with Face Tools (2/4): Detailing & Polypaint

A Step-by-Step Guide from ZBrush Master Pablo Munoz Gomez
Detailing the Skin
One of the biggest advantages of the connection between CC4 and ZBrush is, of course, that you can leverage the ZBrush capabilities and features to sculpt intricate sets of details into your characters.
Gather the Reference of Skin Details
In this next stage, we are going to concentrate on the skin details. One of my favourite resources to study the intricacies of skin patterns is a website by photographer Daniel Boschung: https://www.danielboschung.com/. This website has a bunch of portraits in incredibly high resolution that allows you to zoom in into every single pore and skin imperfection:

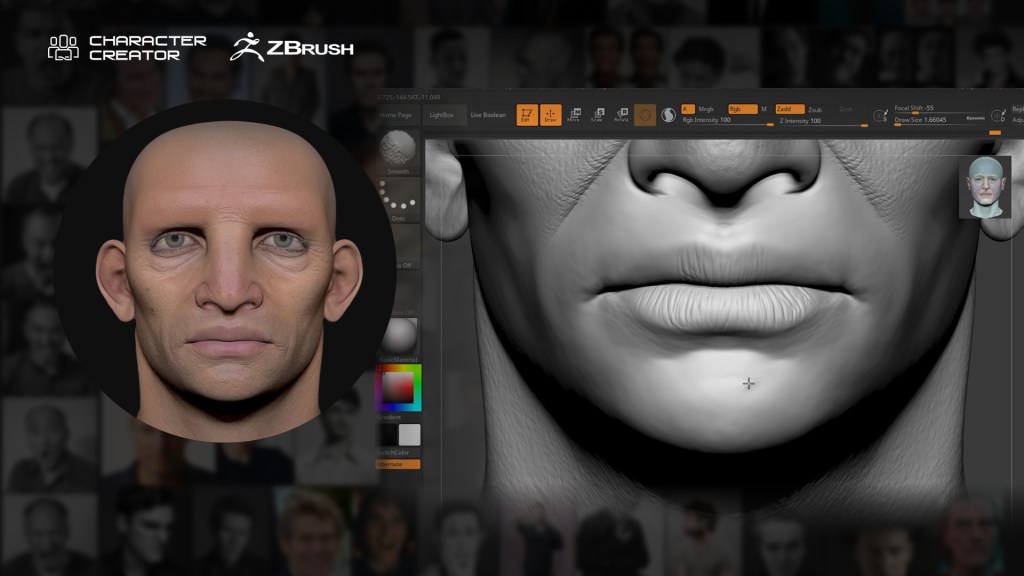
Switch one the Detail Layer on ZBrush Face Tools and Start Sculpting
To start with the process of sculpting details in ZBrush, you can utilise the skin details that come from CC4, since we originally brought in the Normal map as details. To visualise the details, make sure you click on the Detail Layer switch in the Face Tools plugin and that you are in the 7th subdivision level (or 6th depending on which one you sent from CC4). This is to ensure the details are nice and crisp.

For my project, I wanted to cover every aspect of the sculpting process; so, I decided to sculpt my own set of skin details. However, I still think that it is very useful to take advantage of the details layer that comes from CC4. So I used smoothing brushes to reduce the influence of the details from CC4 but keeping a tiny bit of the surface deformations.
Since the subdivision level is pretty high and there are lots of polygons, the standard smoothing brush might not give you the result you expect. In the ZBrush Lightbox, you can go to the brushes folder and within ‘smoothing’ brushes, load ‘Smooth Stronger’. This brush will have a much stronger effect and help you to smooth things out at a higher subdivision level.

Although you can use any of the standard brushes in ZBrush to sculpt details, I used a custom set of brushes that I’ve designed specifically to add high-frequency details to any skin type. This is not necessarily a shortcut but it does help to speed up the process and give you control over the placement of certain details.

At the highest subdivision level, I created the base of details which is a combination of a simple skin pattern, bumps and smoothing peaks:

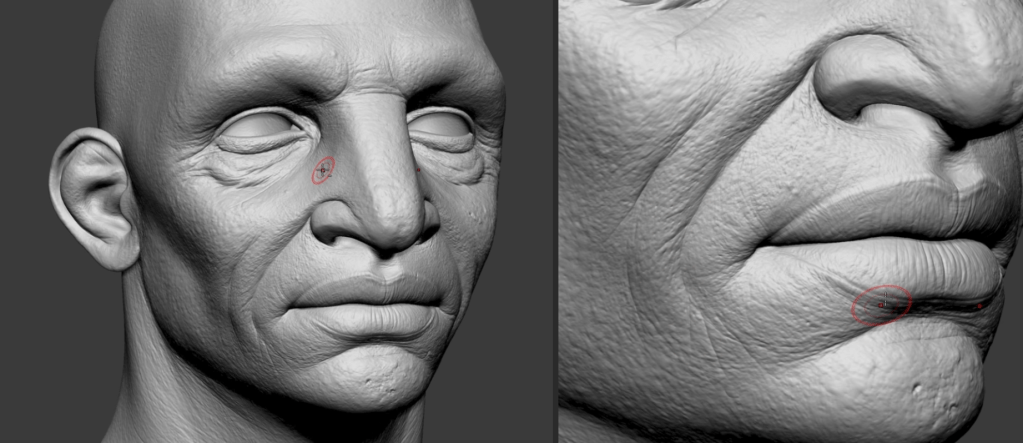
In the custom brushes pack there are various brushes for specific purposes and areas of the face. I used the eyelid pattern for the eyelids and the stretch pores for the areas closer to the nasolabial fold (smile lines):

Ultimately, the process of sculpting details is all about patience and really spending the time to add the right type of pores or details in the right areas.
Update Details from ZBrush to CC
Once you are happy with the base details of the skin you can send them back to CC4 and the plugin will automatically convert those high-frequency details into normal details.
So in this case, after you click the Update to Character Creator button, we only need to select the Details > Normal switch from the pop-up window. This is to transfer all the ZBrush details into a normal map that CC4 can use.

If you encounter an ‘error’ similar to the one depicted in the image below, there’s no need to panic. This occurs when details such as teeth, eyes, or tongue are not included, and the checkboxes in the pop-up window (shown above) are left unticked. Consequently, the plugin attempts to generate a normal map from a high subdivision level, but since these objects lack details in my case, simply click OK to proceed.

That’s about it. Here is a quick comparison of the default details and the custom details I created as a base in ZBrush:

I decided to stylise and exaggerate my details a bit more to make my character look a bit older with some more memory folds and wrinkles. Back in ZBrush, I spend a bit more time working on the custom details until I had this:
Updating the details is another very simple process following the same steps I covered before. However, this time I selected the 4096 switch from the Texture Size section of the pop-up window when sending it back to CC4. This allows me to have a lot more resolution so the details in CC4 will be a lot more crisp and well-defined.

After updating the details map into CC4, here is what my project is looking like:

Keep in mind that we’ve only tweaked two basic things so far: the overall base mesh shape and the details layer. We still need to go through the expressions and Dynamic Wrinkles to create a convincing effect for the deformations of the face.
Texture Polypaint
Another very cool feature of the Face Tool plugin is the texturing portion. I wanted to cover a bit of the texturing process as polypaint to give you some extra tips and tricks before we start with the expressions.
So, within the Face Tools plugin, you can click on the Diffuse switch at the top. This switch will essentially enable the Albedo colour from CC4 as texture in ZBrush:

In order to modify this texture in ZBrush, you need to first convert the information from the texture map into polypaint. This requires you to be at the highest subdivision level so you can capture as much detail as possible from the textures, and then from the Polypaint palette click on the Polypaint From Texture button:

Once you click on the Polypaint From Texture, ZBrush will project the texture map onto all the polygons of your mesh, recreating the texture as vertex colour (or polypaint in ZBrush).
One thing I like to do every now and again when I’m working with textures in ZBrush, is to enable the Flat render type from the Render menu. This is a great way to see a shadeless version of your texture without any information of the material so you can see the true values and hues of your texture:

In terms of the process, the polypainting techniques are pretty similar to the sculpting ones. It is all about subtleties and patience. I like to use the Standard brush (turning ZAdd off and enabling the RGB), with the Stroke set to Colour Spray and using ‘Alpha 08’ that comes with ZBrush.
These simple settings should give you a lot of variation and control:

You can also click and drag from the colour selection in ZBrush to pick up the colour or press the letter C while you hover over the mesh. For my character, I chose a dark desaturated blue colour to add a subtle shade of blue around the eye regions. I also reduced the RGB opacity value to something like 25% so that I have a more gradual transition and ultimately more control over the placement of this new hue.

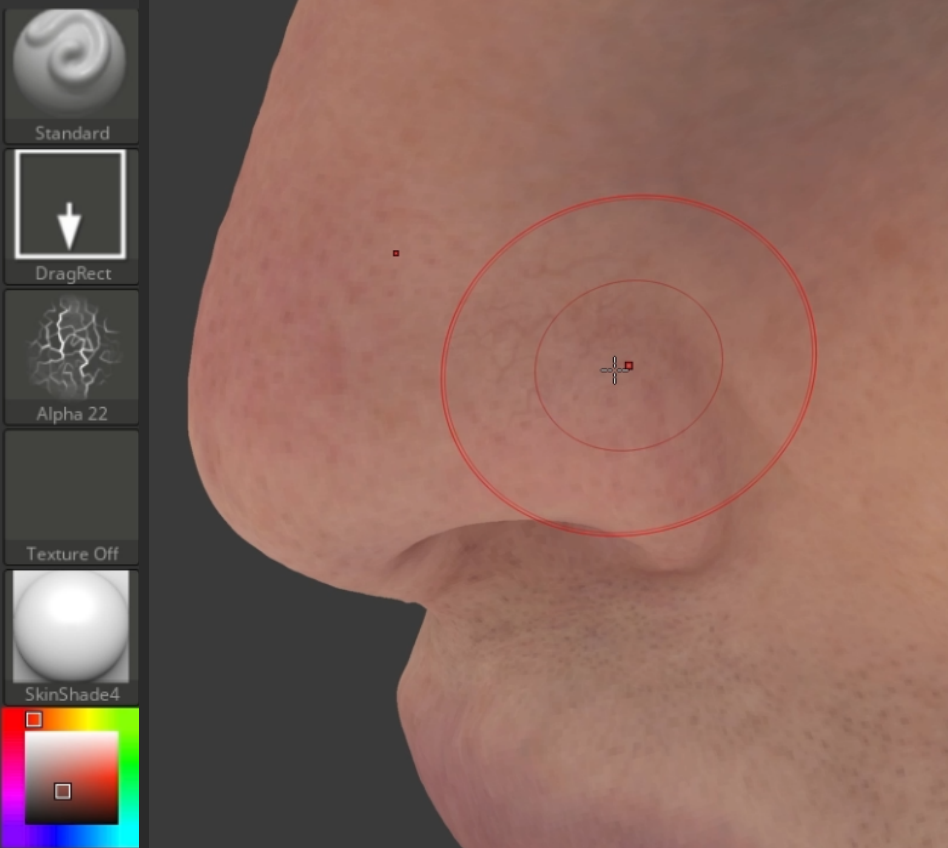
You can keep tweaking the standard brush to add all sorts of details. For instance, you can change the stroke to ‘DragRect’ and use ‘alpha 22’ (also comes with ZBrush) to add small veins and tiny blood vessels like I’ve done here on the nostrils… they are pretty subtle:
Create Custom Mask & Variate the Albedo Colour
Another of my favourite tricks in ZBrush when it comes to texturing, is to use the masking features in the Masking palette to create custom masks and variate the albedo colour.
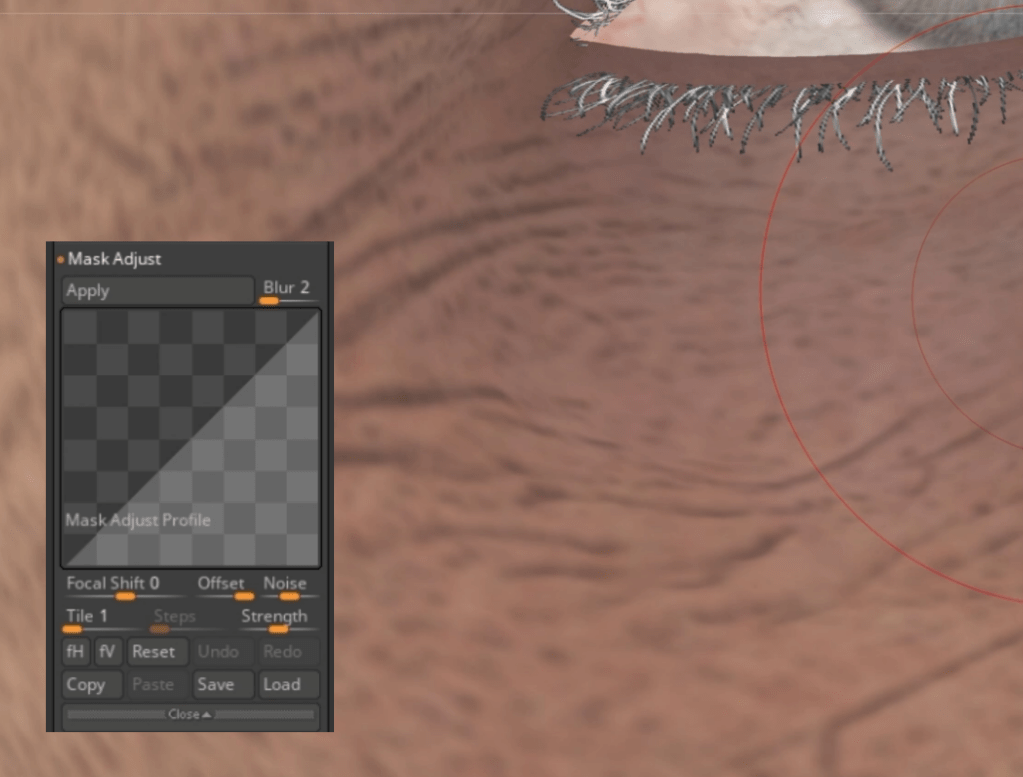
For example, you can use the Mask By Cavity button to mask all the deep crevices and details on the surface. This is a great way to also visualise the intensity of some of the wrinkles and details that we manually added:
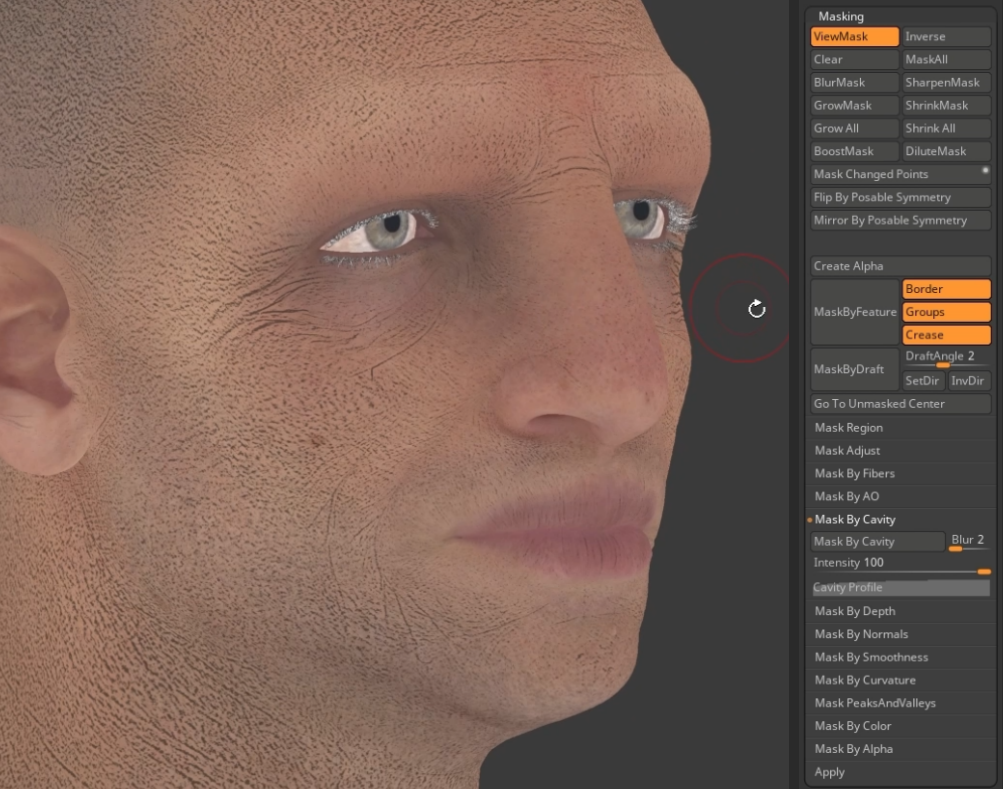
Not only do you have a ‘one-click-operation’ to mask all your details but you can also use the Adjust Mask section to blur the mask a bit and create a softer transition to the unmasked areas:
The rest is more of the same, I like to invert the mask and hide it and then with a darker red tone, I can highlight some of those deep crevices like the wrinkles around the eyes:

Other masking features I really like are the Mask by PeaksAndValleys. This will give you a more random mask pattern, but it is perfect to generate a subtle variation like ‘sunburn’ patches.

With any mask that you generate, you can also use the Adjust Colours button from the Polypaint palette to adjust the hues, contrast and gamma:

If you use the same tool (adjust colours) without any mask you can totally change the colour palette of your skin. Just for fun, here is a ‘zombie’ version of my skin palette:

I intentionally wanted to make a drastic change of colour, just so that I can show you one of my favourite features of this entire workflow… so here it is:
Let’s say that you are happy with the polypaint and all the colour changes you’ve made. You can go ahead and click the Update to Character Creator button, and from the pop-up window, choose only the Polypaint > Diffuse option. For texture resolution, I chose 4096
The plugin will take care of the rest… it will convert all your changes from the polypaint into new textures and send them to CC4 with one click:

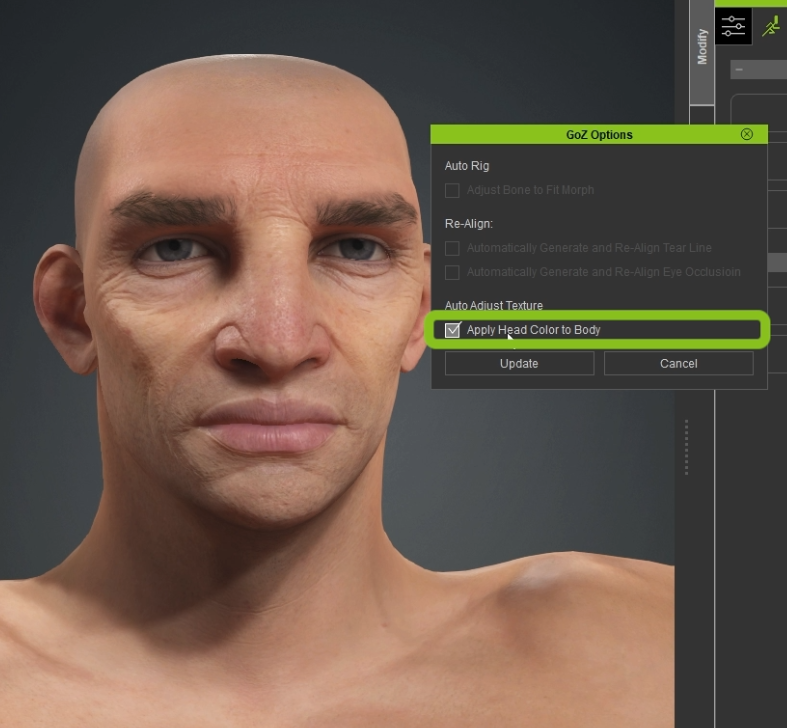
Back in CC4, is where the magic happens… you’ll get a pop-up window and since we are now sending a new texture map to CC4. The Auto Adjust Texture section is available so make sure you tick the Apply Head Colour to Body check box:
Then when you hit ‘update’ CC4 is going to import the new texture (from ZBrush polypaint):

AND, here is why this is so cool… CC4 will match the colour adjustments you did to the head, to the entire body of the character so it feels totally integrated!

At the end, I went back and reverted the ‘zombie’ skin changes and ended up with something like this:

About The Author

Pablo Munoz Gomez is a renowned 3D concept and character artist, with a passion for education. 3D sculpting, visual development, and other mixed-media form the pillars of his artistic passion which he channels through the various platforms that he owns, including ZBrush Guides, 3D Concept Artist Academy, and 3D Snippets Project. Thanks to his vast online following, he is able to reach artists from around the world and help them advance in a variety of 3D-related disciplines.

Read More
Easy Facial Rig in ZBrush with Face Tools (1/4): Concept & Setup
Easy Facial Rig in ZBrush with Face Tools (3/4): Expressions & Wrinkles
Easy Facial Rig in ZBrush with Face Tools (4/4): Animated Demo


