Easy Facial Rig in ZBrush with Face Tools (1/4): Concept & Setup

A Step-by-Step Guide from ZBrush Master Pablo Munoz Gomez

Concept and introduction of ZBrush Face Tools
This comprehensive tutorial dives into the world of expression creation and dynamic wrinkles using Character Creator 4, ZBrush, and the Face Tools plugin. Learn how to leverage this powerful combination to create facial rig and breathe life into your characters.
Before we get started with the step-by-step process of how you can create custom expressions for your characters, let’s take a look at an important stage of the process that is sometimes overlooked: The planning stage.
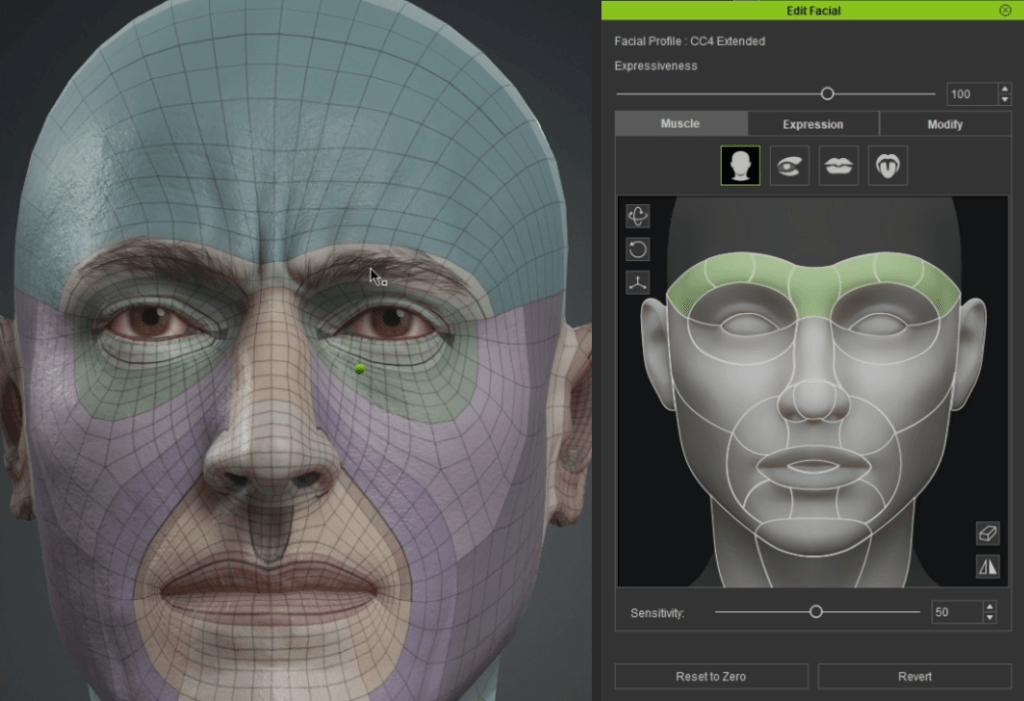
The planning for this project is fairly simple but it is quite important. It is also an opportunity to understand how the meshes from CC4 work and how the expressions and wrinkles are applied so that you can make the most out of it. Here is a simple head project with a texture overlay showing important areas of the face and the clean topology that is used:

These colourful textures are a great way to understand the range of motions and areas where the dynamic wrinkles are applied to create custom expressions. In this case for instance, I’m using the Facial Editor to pull the eyebrows down and towards the centre to produce this ‘frown’ expression:
Using the ZBrush Face Tools plugin, I can easily send the entire head from CC4 to ZBrush and make further adjustments… we’ll get to that in the next section, but here is an example of how simple this workflow is and how well it translates to ZBrush:

Collect the expression reference before using Face Tools
Building a solid reference library is crucial for capturing nuanced expressions in your character, especially during the planning stage. While individual experiences shape unique smiles, the core elements of happiness often involve common muscle movements like raising the corners of the mouth, engaging the zygomaticus major, and potentially crinkling the eyes with orbicularis oculi activation.
Consider gathering high-resolution photos or video clips showcasing diverse individuals expressing happiness, alongside anatomical studies to understand the underlying musculature. This way, you can reference both the commonalities and variations within the expression, ultimately breathing life into your character’s emotions.
To keep things simple but effective, I like to use Pinterest to find my references simply because the algorithm that this platform uses to suggest similar images is fantastic. This is the top results I got from typing ‘Expressions’ in the search bar:

I personally also like to use PureRef to collect all my inspiration and references in one place. So I usually place the browser on one side of my screen and fill the other side with the PureRef board so I can simply drag and drop images from Pinterest into PureRef:

After a few minutes of collecting references, here is what my inspiration board looks like:

I tend to collect a lot more images than what I might actually use as reference — but it never hurts to have more! However, it is important that you filter down your images to just a few that are of high-resolution and that will actually help you to create the expressions.
Set the iconic expression for your character
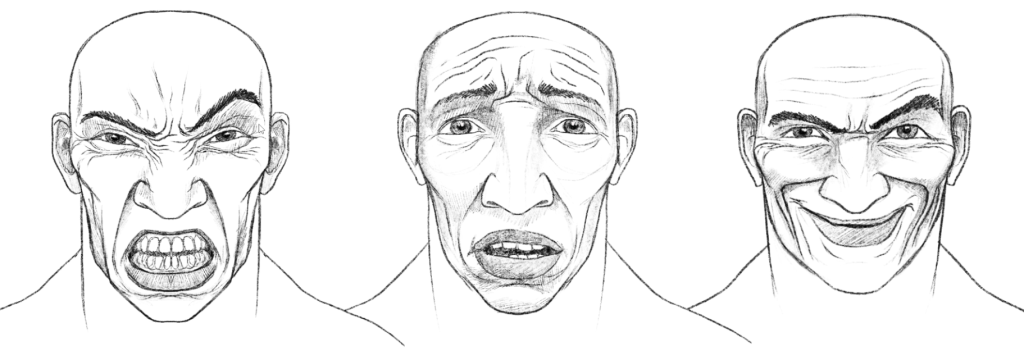
For this project, I decided to focus on three main expressions. Therefore, I create three small clusters of expressions including ‘anger’, ‘surprise/fear’ and ‘evil laugh’:

Another thing that could be very beneficial is to generate some quick sketches of the expressions you are trying to achieve. This might not be 100% exactly what you will end up with, but it will give you a target to hit and keep your project moving in one direction:
An extra step that I find particularly useful, is to do a paint over using your preferred reference image and the expressions range to figure out how you can adjust the CC4 base to match a reference.
I like to emulate a quick expression using the generic project, in this case, a simple smile:

Here is a comparison of the neutral expression and the simple smile:

After selecting one of my reference images, I utilised Photoshop to overlay the colour distribution onto the photo, examining how I could enhance the base mesh. In the image below, observe the subtle light pink hues denoting the cheeks and the nearly absent red shading defining the upper lip. These visual indicators are crucial focal points I would meticulously attend to when recreating this specific expression with a similar customised character (thin and elderly):

Project setup in Character Creator
To start with the practical steps, let’s set up the project first and get our base mesh ready before we add any expressions or wrinkles.
In CC4, I used Kevin, one of the male default projects. You can use any character from CC4 but I like Kevin as a base because it is a scanned human figure that provides some extra nice details.
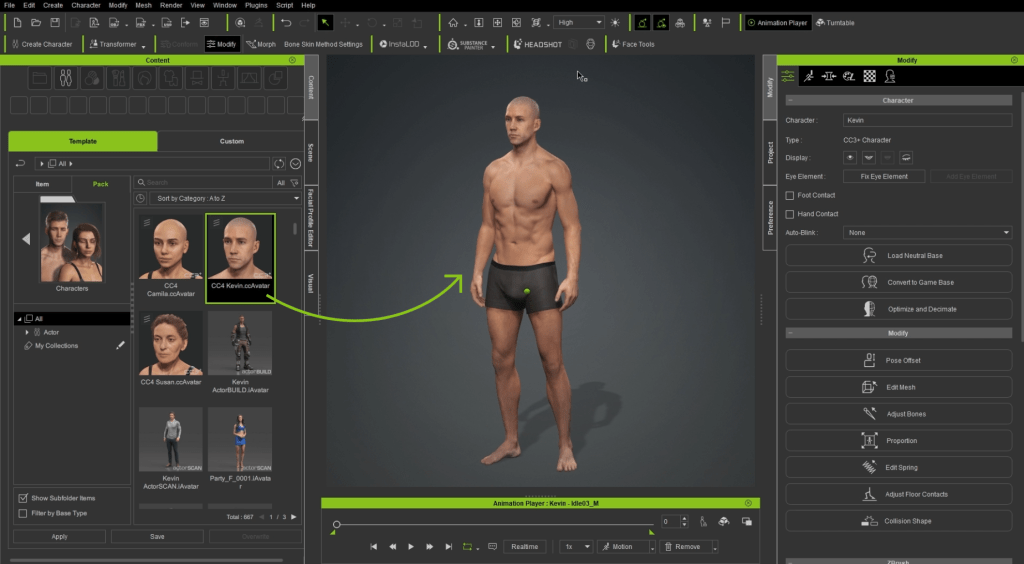
With the character selected, you can use the Modify tab to morph the head and body into the shape that you want for your character. You can be very precise and adjust a lot of very specific parts of the body and face:

I wanted something quite different to the default project, so I exaggerated the proportions and facial features. I also like to temporarily turn off the body textures so I can have a better read of the volumes I’m changing.
From the texture tab of the modify window, you can Shift + Click select all the textures of the body and turn them off at once:
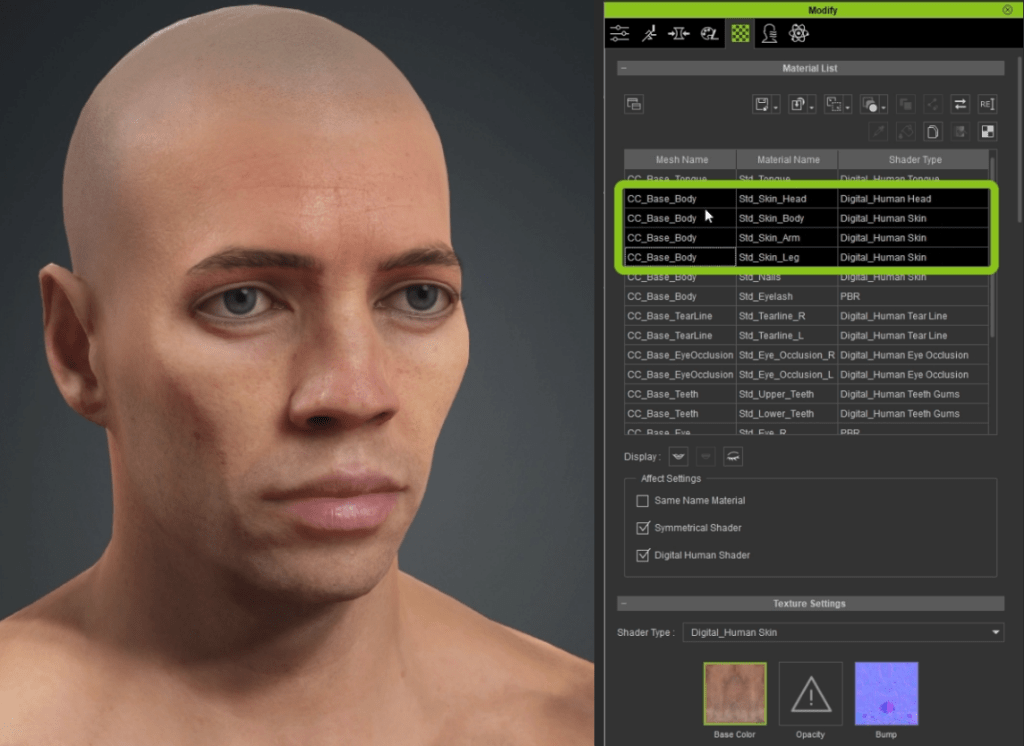
If the skin looks too white or overexposed, you can change the Diffuse colour to a darker grey using the swatches from the Material Settings section:

After a few minutes of tweaking (playing with morphs sliders), I landed on this shape for the head of character:

However, I wanted more control over the shapes, and ZBrush makes that pretty easy. Plus, if you decide you don’t want to stick with a human character and fancy turning it into an elf with pointy ears or something, ZBrush is great for those kinds of adjustments.
This step of adjusting the base mesh in ZBrush is really easy. In CC4, you can go to Plugins > ZBrush Face Tools > Face Tools:

Then, select Base Model Only form the pop up window and hit OK.

The next pop-up window allows you to specify some of the parameters to send to ZBrush. In this case, I set the Action to ‘Create New’ so that CC4 creates a new project with the character in ZBrush, then set the subdivision to ‘Level 6’ and finally made sure that the Normal Details checkbox was ticked:

That’s about all you need to do. The Face Tools plugin will take care of the rest and set up the project in ZBrush using the Normal map from CC4 as the details in the highest subdivision levels in ZBrush.
To visualise the normal details that are sent from CC4 to ZBrush you can click on the Detail Layer switch from the ZBrush Face Tools panel (in the Plugins palette). Make sure you are in the highest subdivision level so you can see all the nice details:

In ZBrush you can use the move, standard and smooth brushes to refine the look of your character. In my case, I wanted a flatter head with a shorter forehead and thicker nose so I adjusted the head in the lowest subdivision level to make the process easier.

The advantage of having the multiple subdivision levels in the model, is that you can go back and forth between higher and lower subdivision levels to adjust either large portions of the mesh (at level 1) and define folds and crevices on a higher level (at level 4 o higher):

After a bit of tweaking of the base mesh, this is the character I ended up with:

Once you are finished with the edits to the base of your character, you can simply click on the Update to Character Creator button (at the bottom of the ZBrush Face Tools plugin), and ZBrush will send everything back to CC4.
From the pop-up window, you just need to make sure that the Base Mesh switch is enabled so that ZBrush knows that we want to update just the base model at this stage.


Back in CC4, you’ll get another pop-up window; make sure all checkboxes are ticked (except Texture which should be greyed out since we didn’t tweak the texture yet).
At this point we’ve only updated the base model to make it a bit more interesting. I like to test a couple of expressions on this updated model to make sure the range is good and there are no weird artefacts.
Using the Facial Editor you can just select areas of the face and pull them around to see the effect in real-time.

So to wrap up this first stage of the process, here is a comparison between what we setup in CC4 and what we ended up with after the adjustments in ZBrush:

About The Author

Pablo Munoz Gomez is a renowned 3D concept and character artist, with a passion for education. 3D sculpting, visual development, and other mixed-media form the pillars of his artistic passion which he channels through the various platforms that he owns, including ZBrush Guides, 3D Concept Artist Academy, and 3D Snippets Project. Thanks to his vast online following, he is able to reach artists from around the world and help them advance in a variety of 3D-related disciplines.

Read More
Easy Facial Rig in ZBrush with Face Tools (2/4): Detailing & Polypaint
Easy Facial Rig in ZBrush with Face Tools (3/4): Expressions & Wrinkles
Easy Facial Rig in ZBrush with Face Tools (4/4): Animated Demo


