
Introducing PetCam: a non-invasive machine-learning-powered pet tracker that runs on an old smartphone. This project is a collaboration between me and Jason Mayes, who came up with the idea. Also, funny story, uh… my colleague Markku Lepistö built (almost) THE EXACT SAME PROJECT at the same time on his own YouTube show, Level Up, which you can see here. We use old smartphones. He uses a Coral development board. Choose your own adventure.
When I was young and lived at home in New Jersey, my parents were really strict with me about remembering to close the garage at night. Because if I didn’t close the garage, something like this would happen:

Then the next morning, we’d walk out the front door, get hit with a strong whiff of dirty diapers, and see a trash bag torn up and emptied all over our driveway. Clearly someone had a wild night.
Bears love eating trash. Raccoons love eating trash. Even foxes will have a go at trash at it if you make it easy for them. All considered, I probably should have gotten better about remembering to close the garage. But it also would’ve been nice to have hacked a little machine learning app onto my dad’s Nest camera rig, so that whenever it did spot a bear taking out our trash, it would play a loud, menacing-sounding air horn noise that would scare the bandit back into the woods.
What I wanted back then was PetCam, the project I bring you today: an app that alerts when your dog, cat, bird, chicken (more animals pending) jumps on your bed, couch, chair, laptop, and more.
When Fluffy jumps on your couch (the “event of interest”), PetCam sends you an alert via Slack and saves a snapshot to a “diary” app in the cloud.
PetCam can be run on a smartphone and processes all video locally (i.e. the video stream never leaves your device). But if you do want to save a picture of an event of interest (i.e. snap and save a photo of Fluffy on the couch), you can configure PetCam to send a photo of just that moment to the cloud.
Here’s the overview.
Architecture
This project is divided into three main parts:
1. Pet-Detecting Frontend
This is the bit that uses your camera and a TensorFlow.js machine learning model to analyze your pets’ behavior. It’s built in simple Javascript and runs in the browser, and you can try it out yourself right now here.
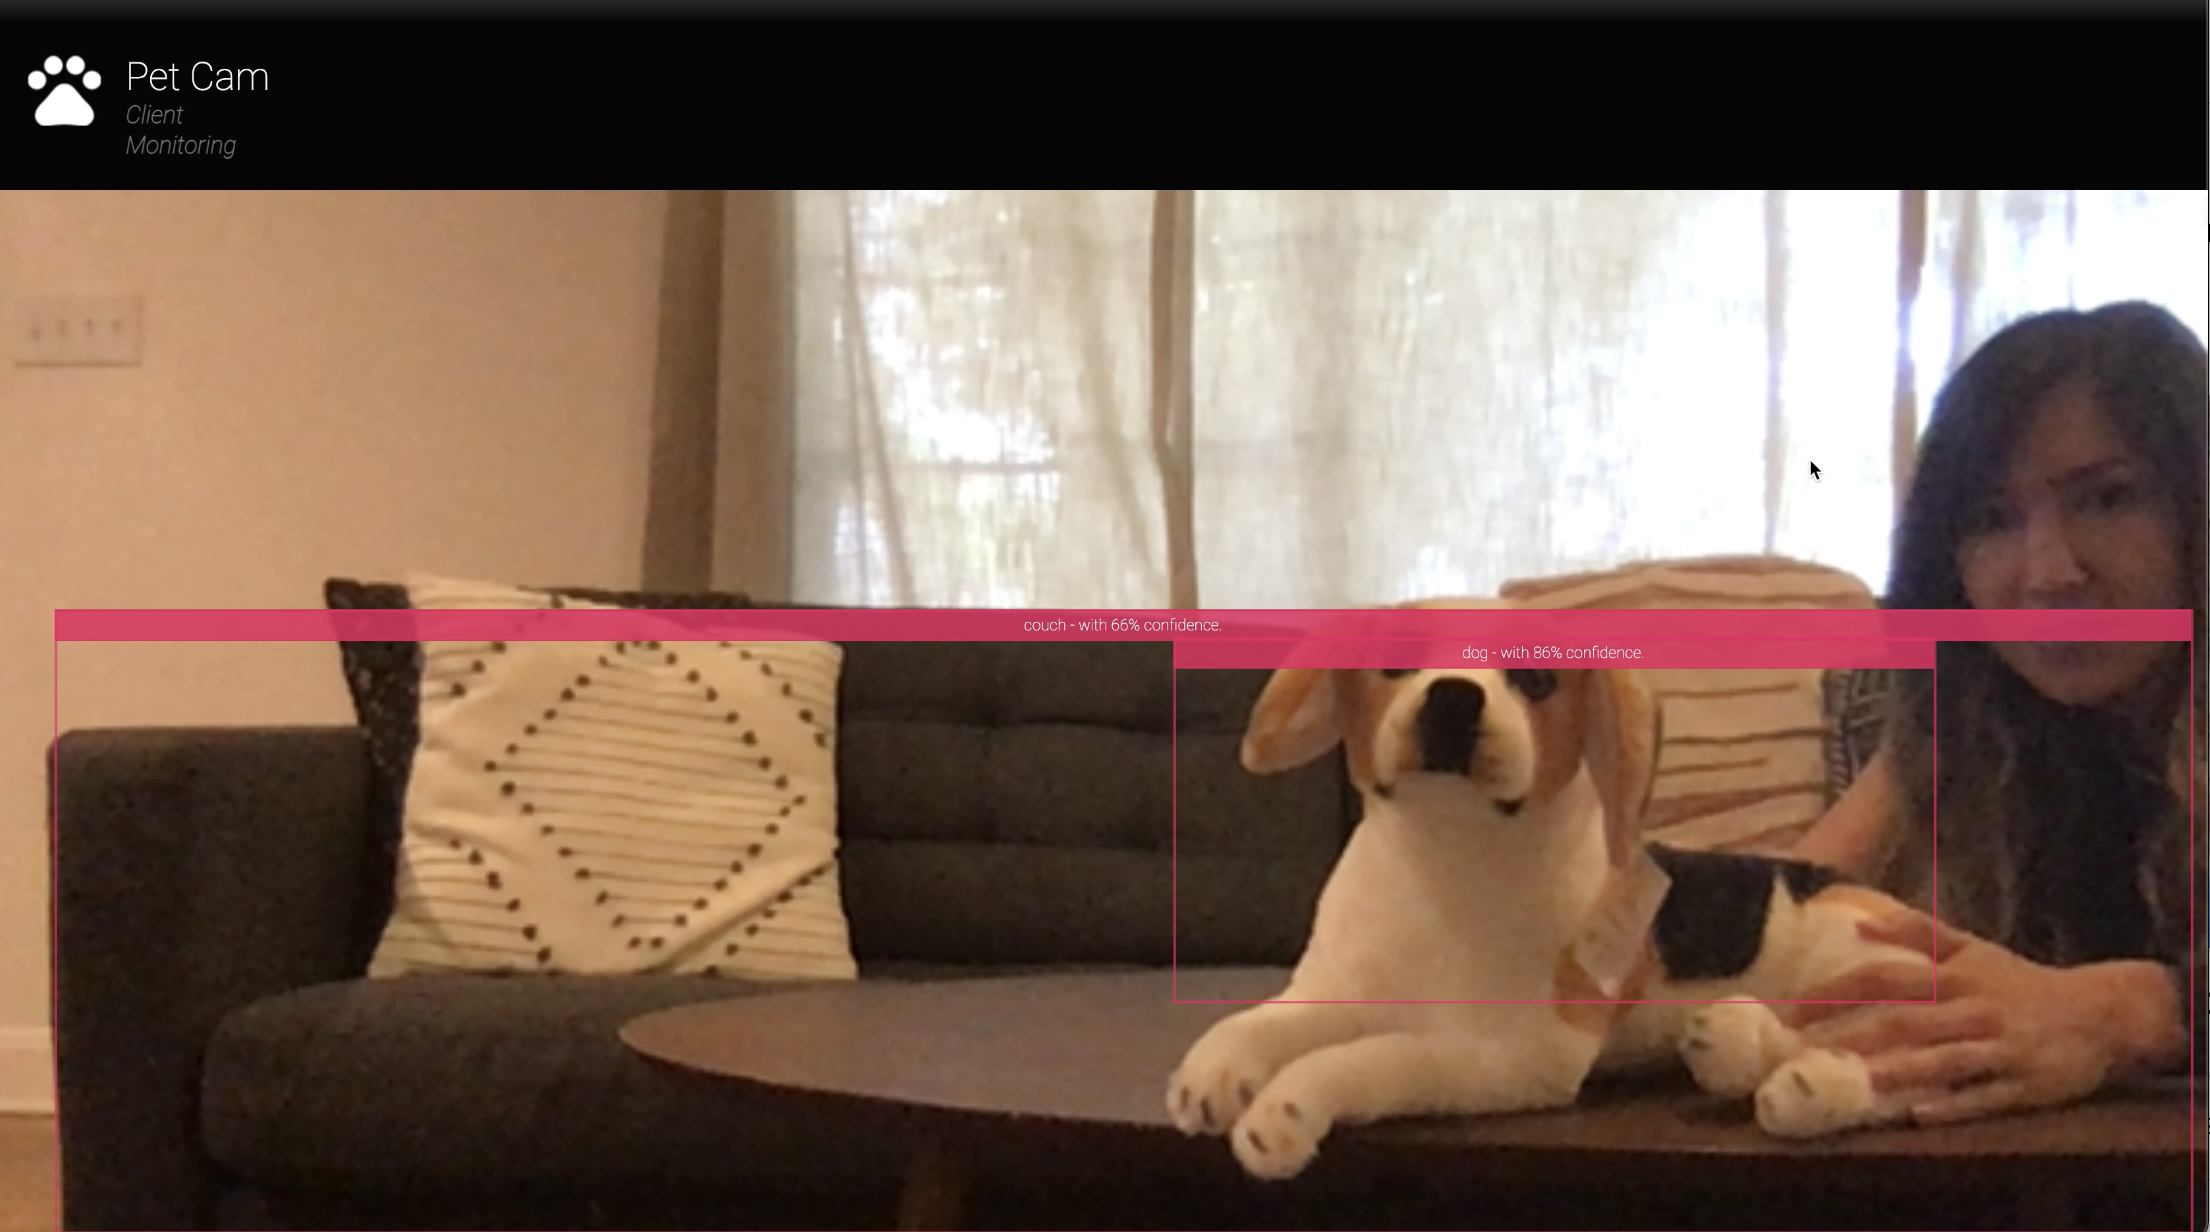
It uses a TensorFlow.js machine learning model that analyzes data from your phone’s camera (or webcam) in the browser, without ever sending data back to the cloud (this is what makes it “privacy-preserving”). However, to save these events in a log (i.e. “cat on the couch”), we do send photos and event strings to Firestore so that we can later view events in a diary (more on that next).
2. Pet “Diary” Frontend
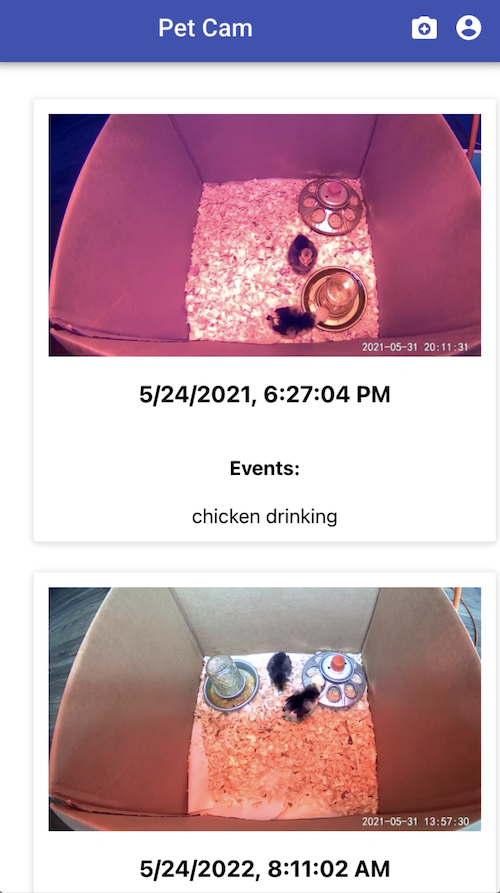
The “diary” second frontend app that lets you view a log of all the activities your PetCam detected. It basically loads data saved in Firestore into a pretty UI:
3. Firebase Backend (+ Slack API)
The serverless “backend” does two things: it stores a log of events and photos and also powers Slack notifications. So, when your pet does something neat, you get a Slack ping about it:
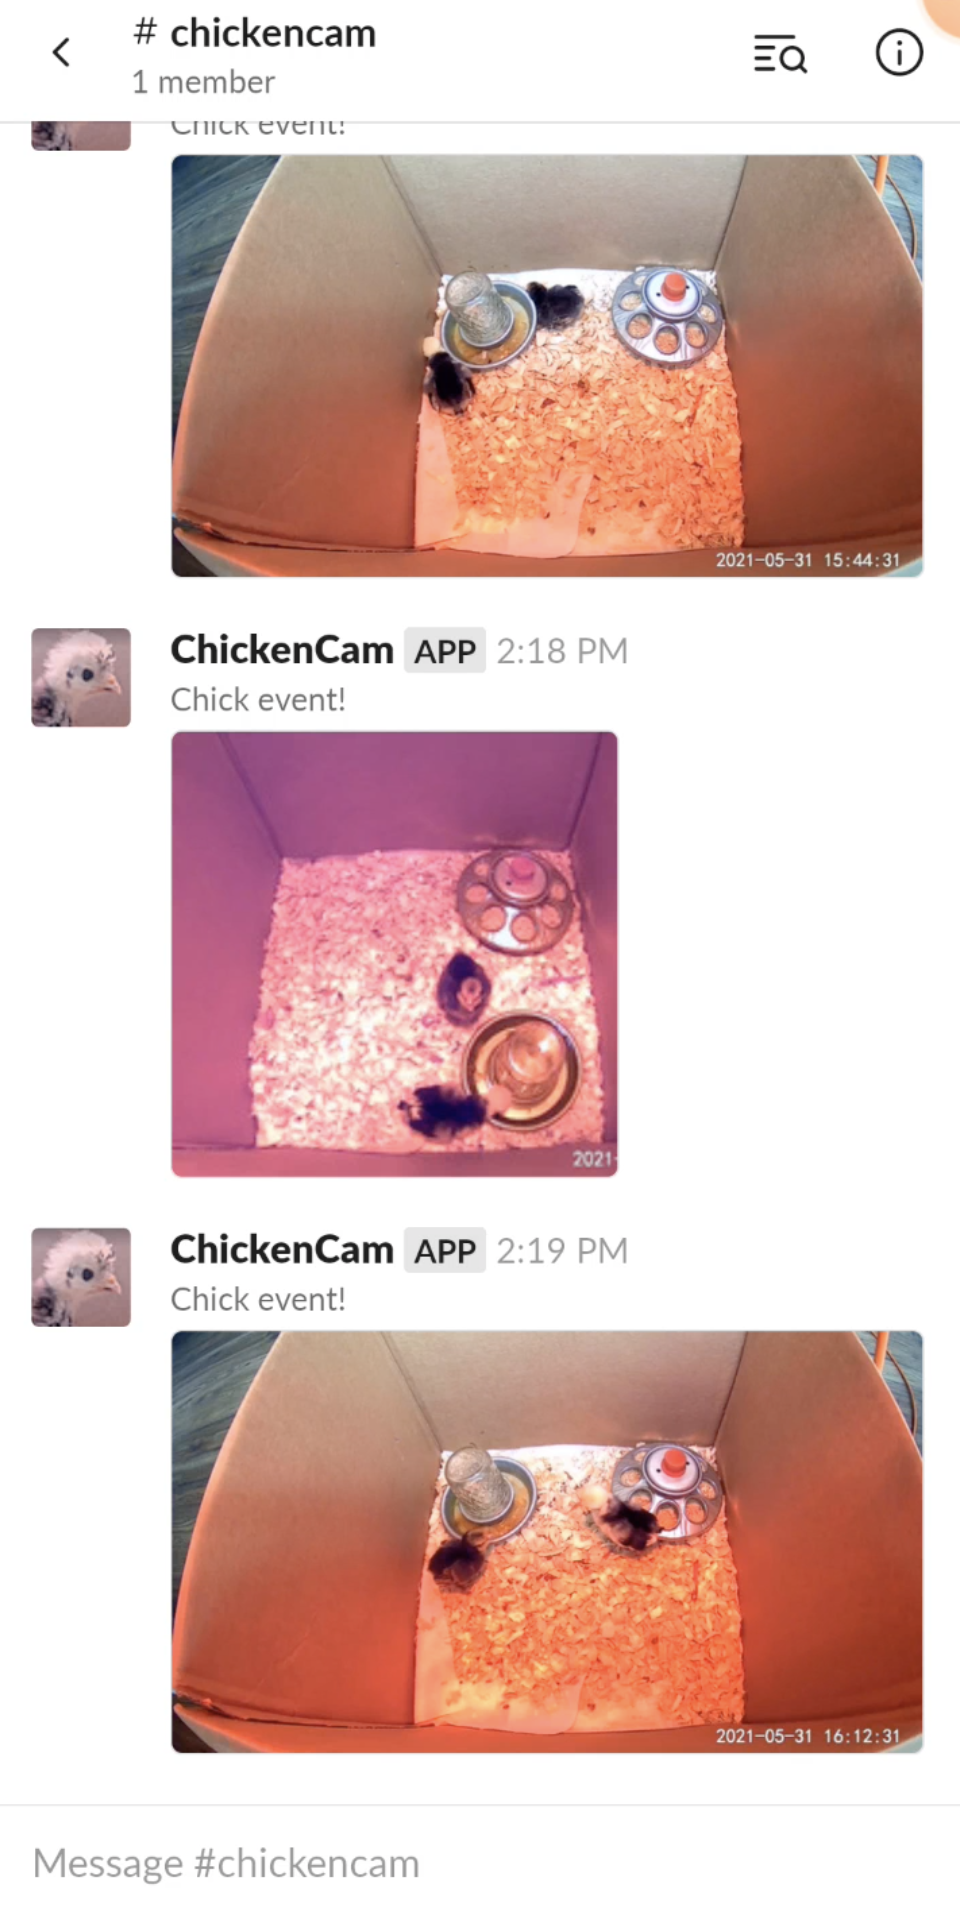
This is all powered by Firebase, Google’s lightweight tool suite for building serverless backends, plus the Slack API.
3a. AutoML Vision Chicken-Detection Model
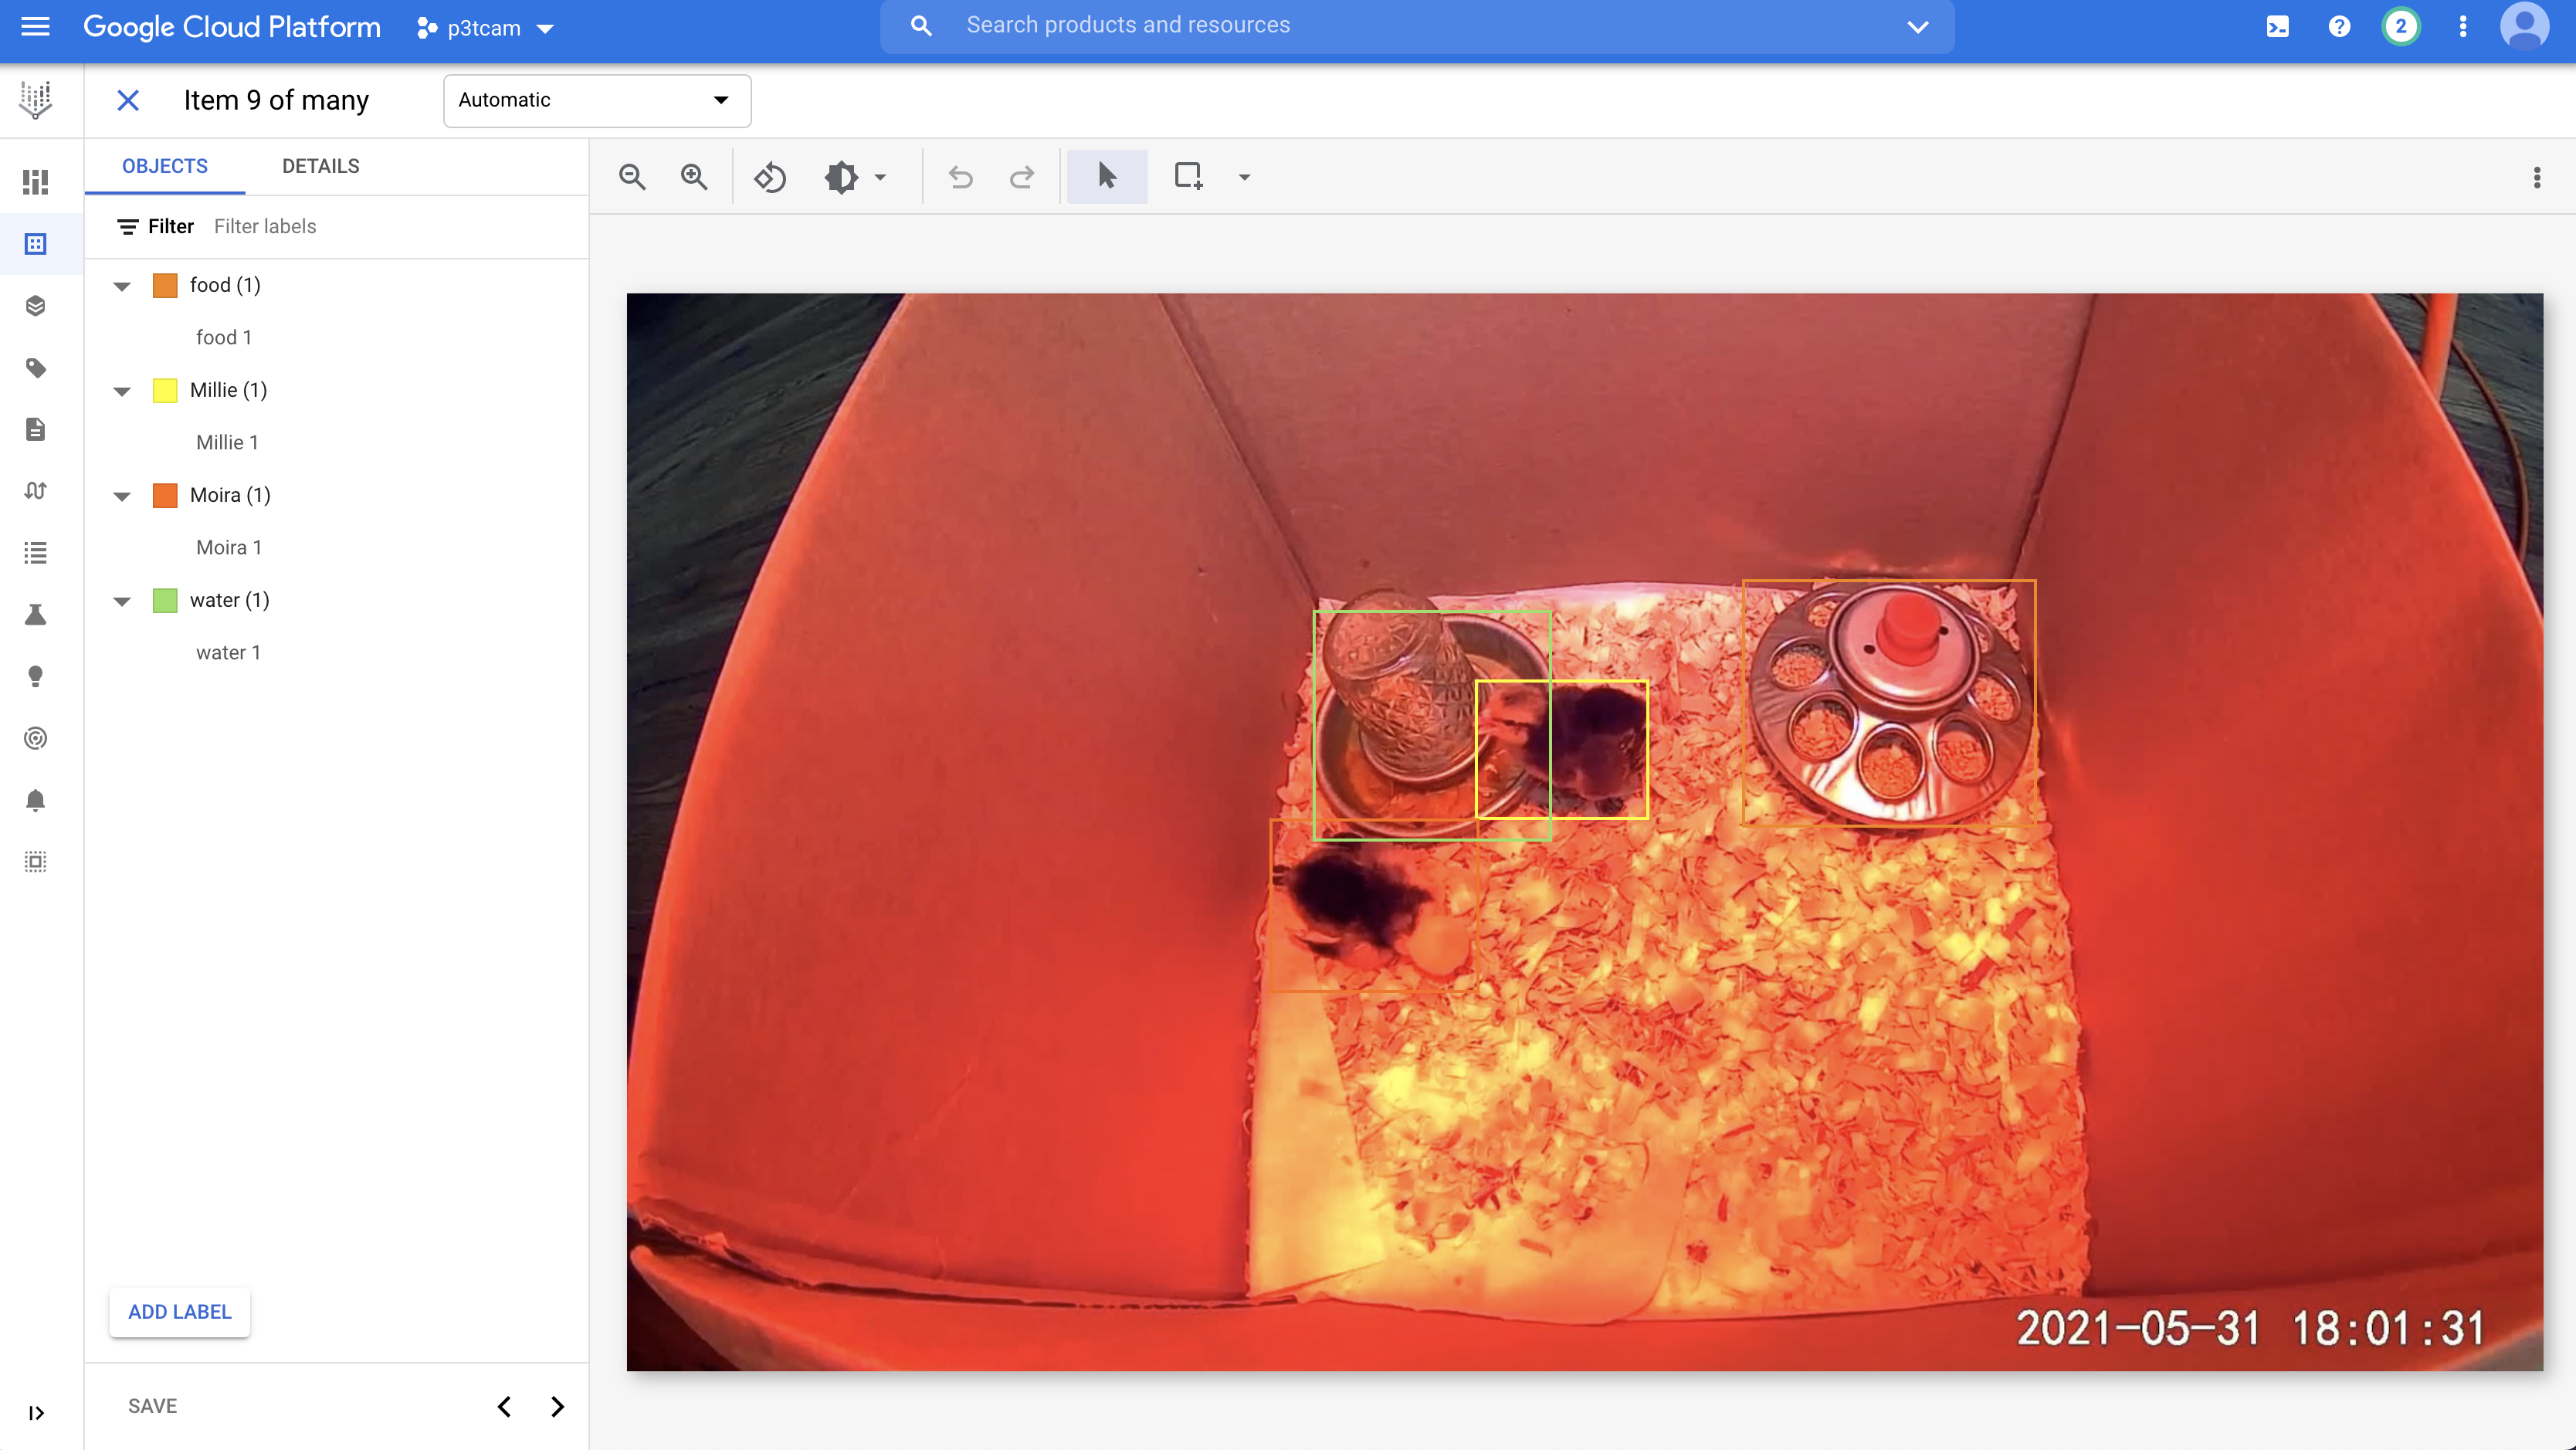
Okay, this part is really a “nice-to-have.” For PetCam 1.0, we’ll use a pre-built machine learning model (Coco SSD) that analyzes lots of animals by default. But it doesn’t recognizes baby chicks (my new and only pets) that well. So in this third part, we’ll build a custom TensorFlow chicken-detection model using Google Cloud AutoML:
Phew, this project is kind of a chonker, isn’t it? Two different frontends, isn’t that a little extra? As always, you can find all of the code to build this app yourself here in the Making with ML repo. Or, if you just are about the pet-tracking frontend, you can find the code and a live demo in the Glitch link.
Now, since this project is so big and my attention span is so small, I’m not going to bore you with all the little minutiae of how Jason and I set up authentication and installed TensorFlow and deployed a cloud function and blahdy-blah. You can figure most of that stuff out yourself by reading the code, reading the README, watching our YouTube video [TODO], or (please don’t murder me) by googling around.
Instead, I just want to cover each component at 5,000 feet and focus mainly on the tricky, unexpected hurdles Jason and I had to solve when we built this thing, so that you don’t have to solve them yourself and so we can feel smart.
Now, to the code mines!
Tracking pets (or people or cars or Amazon packages)
Have you ever tried doing object detection on your webcam, in the browser, using Javascript?
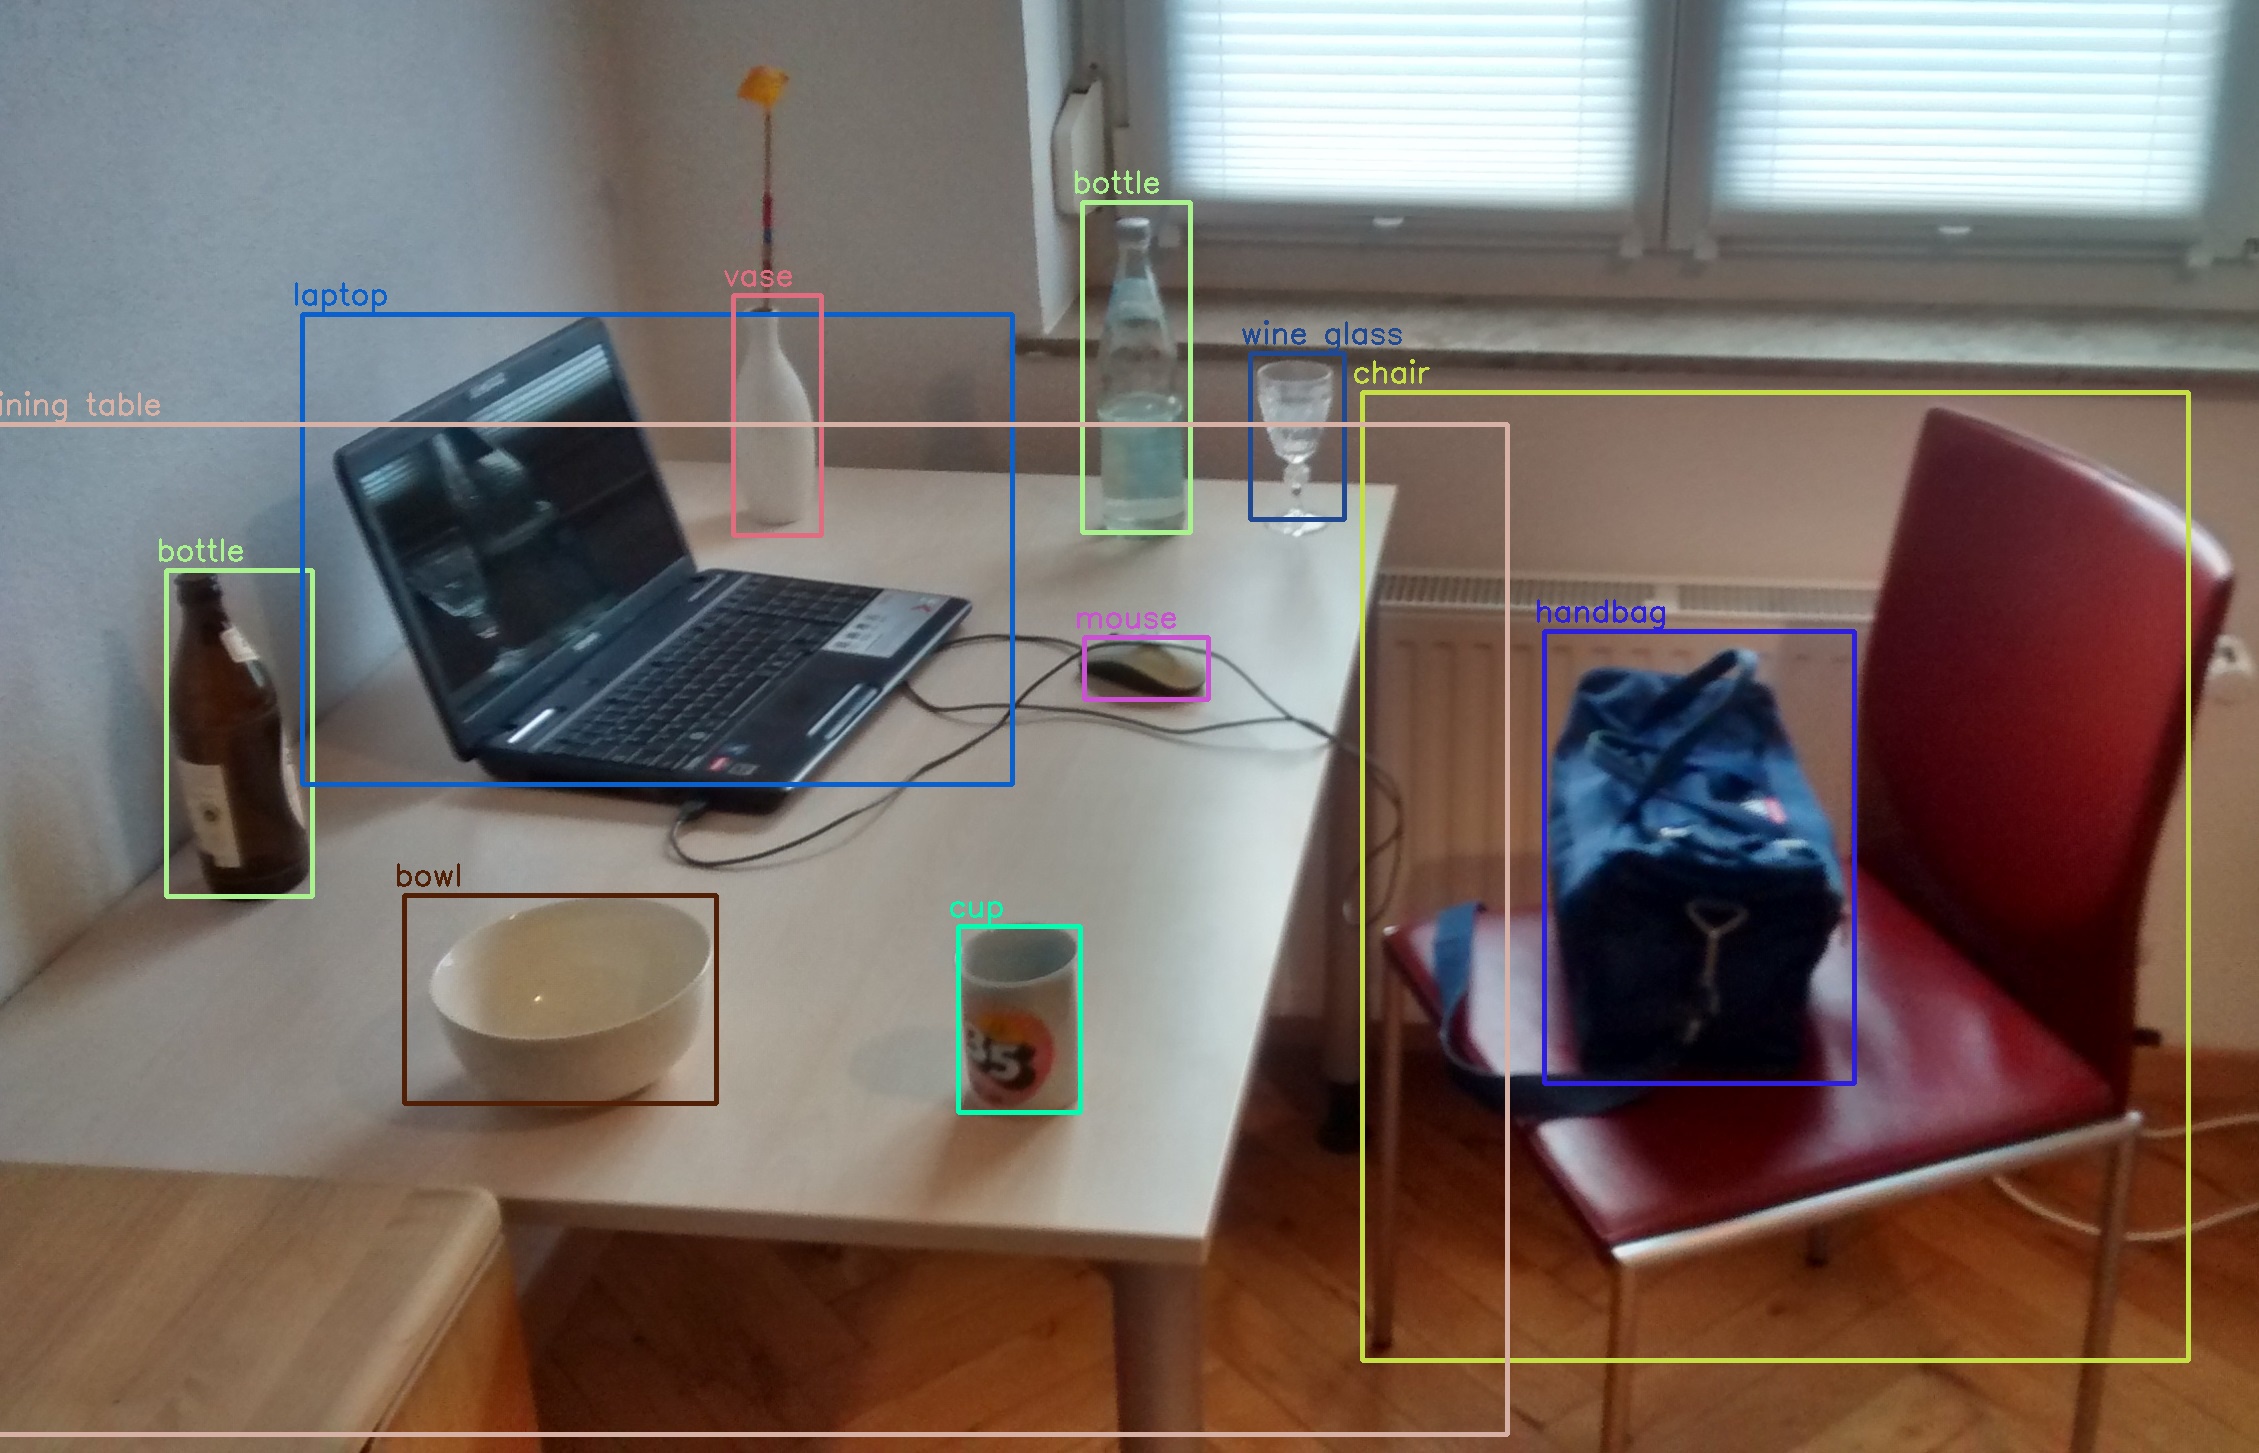
Image by MTheiler from Wikipedia
Turns out it’s really easy. Too easy, if you ask me! Soon your cats will be building web apps to track you.
You can set this up in a few lines of code:
What this code does first is load a pre-trained, general purpose COCO-SD computer vision TensorFlow.js model. COCO-SSD recognizes 80 types of objects, including but not limited to: giraffe, tie, wine glass, broccoli, hair dryer.
Using the model is as simple as calling `model.detect(video)`, where `video` is a pointer to your webcam stream. (That’s `video id=”webcam” autoplay></video>` in HTML land). It makes more sense when you look at the code here in Glitch.
To analyze a stream of video rather than just a single frame, run `model.detect` in a loop. Voila! You have real-time object detection.
How to Calculate Bounding Box Intersections/Distances
Jason and I designed this app so that when two objects you care about intersect–a dog and a water bowl, a cat and your laptop, you and your refrigerator–the app triggers an event, i.e. “HUMAN AT THE FRIDGE.” We then save that event to a Firestore backend so that we can view a log of all past events in the future, and trigger a Slack notification (more on the backend in a bit). By intersect, I mean when two bounding boxes around the detected objects intersect:
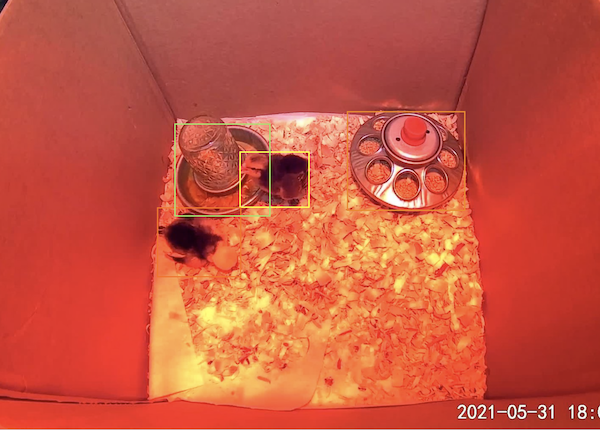
In this picture, my adorable little chick Millie is “intersecting” with her water dish, and therefore I conclude she’s probably drinking.
Jason also built out a nice interface that helps you select what two objects you want to track:
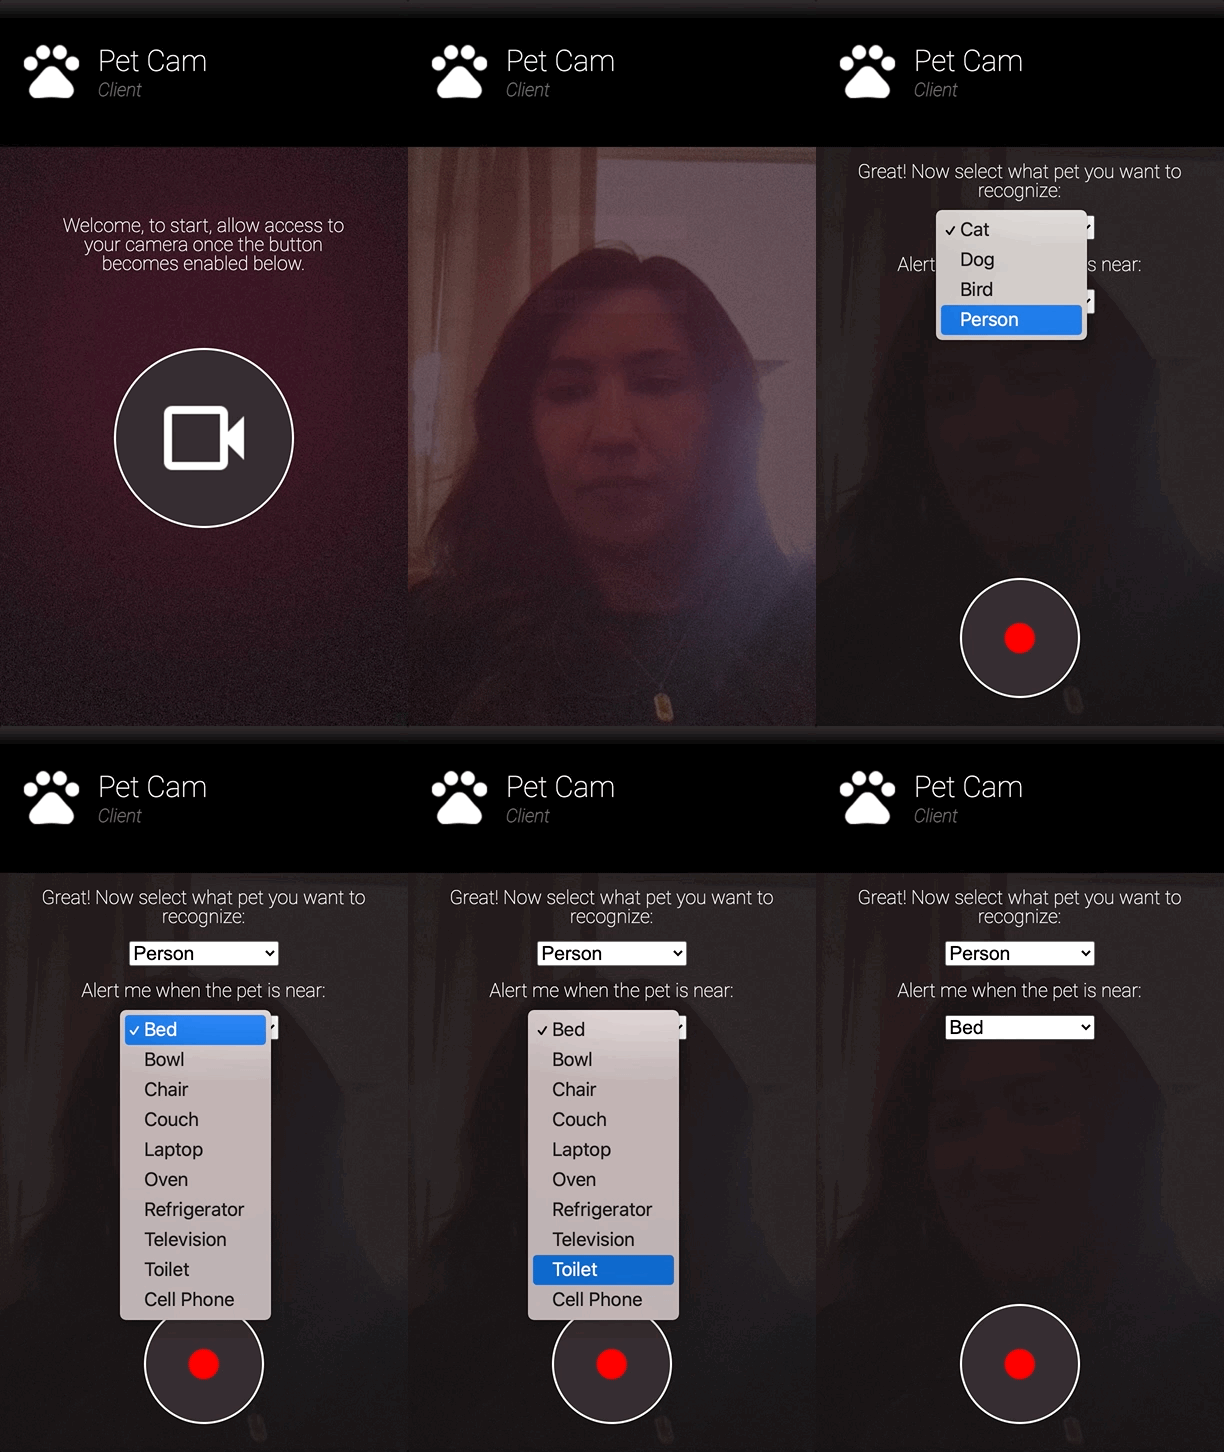
How do you calculate how close two bounding boxes are to each other? For this project, we wanted to know not just whether or not two bounding boxes (“bboxes”) intersect, but also, if they don’t, how far apart are they? Here’s the code:
It returns 0 if the two boxes intersect, or the distance between them if they do not.
Knowing When to Send Alerts
Once I figured out that box-intersection code, I felt brilliant! But then Jason and I discovered a less sexy but far more troubling problem we didn’t know how to solve: how do you know when to save an event and send the user an alert?
Recall that to do real-time object detection and tracking, we run code to analyze our webcam image and detect an intersection multiple times a second, in a loop. So, if your corgi Rufus is just chilling on the couch, we’ll compute that the “dog” bounding box intersects with the “couch” bounding box multiple times a second. Obviously, we only want to count this as an “event” the first time this happens, when Rufus jumps on the couch, but not after. Then if Rufus leaves and comes back later, we can fire the event again. So maybe we make a variable that keeps track of whether we’ve sent a notification to the user, and resets it when Rufus leaves the couch.
Except it’s more complicated than that, because what if Rufus is kind of hovering in front of the couch, or running around it, so our code detects him as “on” and “off” the couch many times in the same few seconds? Like this doggo with the zoomies?
We don’t want to spam our user with notifications for events that aren’t really “unique.” We need to do some sort of “debouncing,” limiting how frequently we can send alerts. Seems simple, right–like we should just add a cool down period so we don’t send users too many notifications too close in time? This is, in fact, what Jason and I did, and in code it looks like this.
// Min number of seconds before we send another alert.
const MIN_ALERT_COOLDOWN_TIME = 60;

if (sendAlerts) {
   sendAlerts = false;
   sendAlert(naughtyAnimals);
   setTimeout(cooldown, MIN_ALERT_COOLDOWN_TIME * 1000);
}
Except a cool down period is not enough! Because what if you have two dogs, or many dogs, running on and off the couch? Because if Rufus jumps up and then Milo jumps up right after him, those are two unique events, and we want to alert the user for both. Suddenly you have to know which dogs are moving around and keep track of their state and you have a hairy “multi-object tracking” problem, which sounds like someone’s PhD thesis, and it is! (Actually, you do get this functionality for free via the Google Cloud Video Intelligence API, but we’re stuck here in TensorFlow.js land and it’s hard).
This realization really had me sweating, and for a while, Jason and I thought we were screwed. But then we ended up doing what one always does when out of one’s technical depth: solving a not-as-good but much, much simpler problem. Our compromise was this: we would settle for alerting users when the number of dogs on the couch increased, but not when the number of dogs was going up and down in flux, like this:
To implement this, we kept a counter of how many animals were in frame. If the number of animals increased, we sent a notification and incremented the counter. However, we never decremented the counter unless the number of animals in frame reached zero (at that point, we did a hard reset). Kinda weird-sounding, but take a look at the code here:
It’s a bit non-intuitive to set up an alert system like this, but take a second to convince yourself that it actually gives you the behavior you, as a user, probably want. Here are some different cases our algorithm fires or doesn’t fire off an alert:
| Scenario | Send Alert? |
|---|---|
| 1 dog -> 2 dogs | Yes |
| 2 dogs -> 3 dogs | Yes |
| 3 dogs -> 2 dogs | No |
| 2 dogs -> 1 dog -> 2 dogs | No |
| 2 dogs -> 1 dog -> 0 dogs -> 1 dog | Yes (for the very last dog that jumps on the couch) |
Phew. On to simpler stuff!
Building a Pet Diary/Viewer App
So far, everything we’ve talked about runs entirely in your browser. This is nice, because no data is leaving your phone or computer, so you can feel good from a privacy perspective. However, when events of interest do occur, we want to be able to persist them to memory and revisit them later. For that, we’ll use Firebase Firestore, a simple ‘n lightweight database in the cloud that you can easily read from our write to in the browser.
I’ve used Firestore in so many projects and talked about it so many times on Dale on AI, I won’t go into detail here. When the frontend PetCam app detects an event (via the algorithm above), it writes some event data to Firestore. Here’s what my Firestore database looks like:
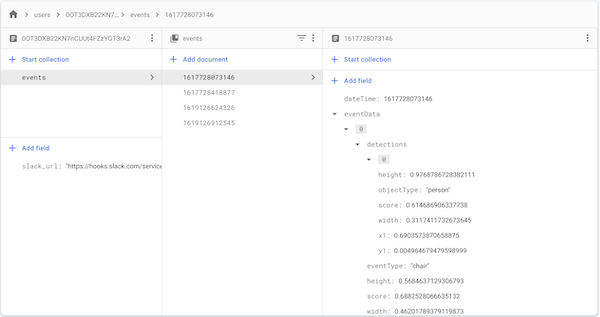
Because it’s easy to write to and read from Firestore, building a frontend “diary” viewer app around the data saved Firestore was pretty straightforward. I built it using React, and you can find the code here. Here’s what the viewer app looked like:

Discover more from reviewer4you.com
Subscribe to get the latest posts to your email.


