
In the world of Amazon PPC (Pay-Per-Click) advertising, success often boils down to a simple principle – bid on ads that generate profits and avoid those that don’t.
It sounds simple, yet many Amazon sellers tend to overcomplicate their PPC strategies.
So, we’re going to delve into the importance of adding negative keywords to your Amazon PPC campaigns and show you how to do it efficiently and in bulk, saving you valuable time and resources.
Sound complicated?
Don’t worry. We are here to help!
Get ready to meet your new best friend in the world of Amazon PPC – Bulk Operations 2.0.
Let’s not get too far ahead of ourselves. Let’s simplify things so we have a good understanding of our PPC strategy and what we are doing to increase our profits while making our process easier.
Simplifying Amazon PPC: Why It Matters
You’ve got your Amazon store up and running, you’re selling some fantastic products, and business is picking up. As your sales grow, so does the complexity of managing your advertising campaigns.
It’s like juggling flaming torches while riding a unicycle – not for the faint of heart!
That’s where simplifying Amazon PPC comes in. We believe that at the end of the day, PPC is all about keeping things straightforward. It’s about bidding on ads that put money in your pocket and steering clear of those that empty it.
The more complicated things get, the harder it is to keep track of what’s working and what’s not.
The Magic of Negative Keywords
Now, let’s talk about a secret weapon in the world of PPC: negative keywords.
Imagine this – you’re running an ad campaign, and your budget is like a leaky bucket, slowly draining away. What if we told you that you can plug those budget leaks with negative keywords?
These little gems ensure that your ads don’t show up for search terms that won’t make you a dime.
By adding negative keywords, you’re optimizing your ad spend. You’re telling Amazon, “Hey, don’t waste my money on clicks that won’t lead to sales!”
It’s like putting your ad dollars on a strict diet, making sure they only go where they’ll do the most good.
Meet Bulk Operations 2.0: Your Time-Saving Sidekick
Now, we know what you’re thinking: “This all sounds great, but who’s got the time to manually manage hundreds of campaigns and add negative keywords one by one?”
That’s where Bulk Operations 2.0 comes to the rescue!
Bulk Operations 2.0 is like having a superhero sidekick for your Amazon PPC. It’s a tool designed to make your life easier, your campaigns more efficient, and your profits healthier.
With this tool in your arsenal, you’ll be amazed at the time you can save while optimizing your Amazon PPC campaigns.
We’re going to walk you through the entire process. From downloading bulk files to creating negative keyword templates and uploading them.
Plus, we’ll share a bonus tip that could take your PPC game to a whole new level.
Are you ready to simplify your Amazon PPC journey, maximize your ad spend, and meet your new sidekick?
Keep reading! We’re about to embark on a journey that could transform your Amazon business.
Streamlining the Process with Bulk Operations 2.0
Imagine being responsible for hundreds of Amazon PPC campaigns, each with its own set of keywords, search terms, and budget considerations.
It’s enough to make anyone’s head spin! But fear not, because we’ve got the solution – Bulk Operations 2.0.
The Challenge: Managing Hundreds of Campaigns
Let’s face it – managing a handful of Amazon PPC campaigns can be a breeze. You can keep a close eye on each one, making adjustments, optimizing keywords, and ensuring your ad spend is working its magic.
That is all well and good, but what happens when you’re juggling not just a handful, but hundreds of campaigns?
That’s when things get tricky.
The more campaigns you have, the more time and effort it takes to keep them all in check. It’s a bit like herding cats, and it can quickly become overwhelming.
That’s where the Bulk Operations 2.0 tool steps in to save the day.
Introducing Bulk Operations 2.0: Your New PPC Sidekick
Bulk Operations 2.0 is your ticket to regaining control over your Amazon PPC campaigns. It’s a game-changer for sellers who understand the importance of efficiency and want to optimize their advertising efforts without burning the midnight oil.
This tool is designed to simplify the complex process of managing multiple campaigns. Whether you’re a seasoned Amazon seller or just starting, Bulk Operations 2.0 has something to offer. It’s like having a dedicated assistant that never sleeps, tirelessly working to save you time and boost your profits.
Unlocking Time Savings and Benefits
So, what can you expect from Bulk Operations 2.0?
Time savings, for starters.
Imagine being able to perform tasks that would usually take hours or even days in a matter of minutes.
With this tool, you’ll no longer need to manually add negative keywords to each campaign or ad group. Instead, you can streamline the process and focus your time and energy on other aspects of your Amazon business.
But time savings are just the tip of the iceberg.
Bulk Operations 2.0 comes armed with a range of benefits that can transform the way you approach Amazon PPC. From better ad spend optimization to improved campaign management, it’s a tool that can make a real difference in your bottom line.
We are about to dive into the practical steps of using Bulk Operations 2.0. We’ll show you how to harness its power to simplify your Amazon PPC efforts and supercharge your profits.
Getting Started with Bulk Operations 2.0
Now that you’re eager to put Bulk Operations 2.0 to work for you, let’s dive into the nitty-gritty of how to get started.
Step 1: Downloading the Bulk File
Your journey begins by downloading the bulk file from your Amazon ad console. Here’s how you do it:
1. Log in to your Amazon Ads console.
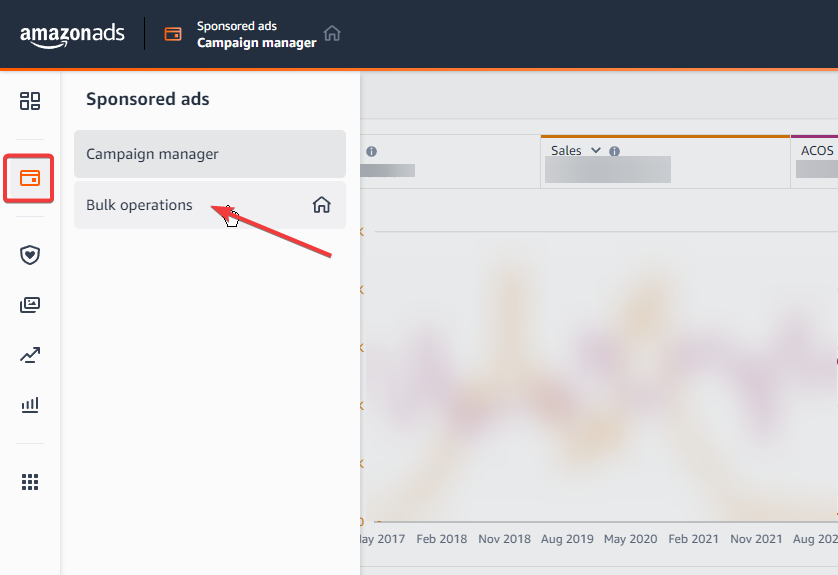
2. Click the Sponsored Ads icon and select Bulk operations.

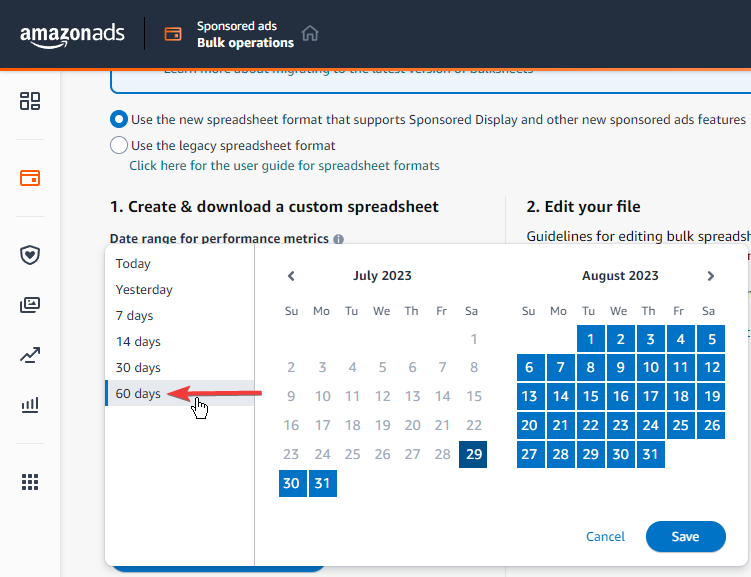
3. Under the 1. Create & download a custom spreadsheet heading, click the Date range button and select 60 days. Click Save.
4. Leave the default items checked. Click the blue Create spreadsheet for download button.
This step will generate a bulk file that contains the essential data you need to manage your campaigns efficiently. Depending on the size of your account, it might take a few minutes to compile, so be patient.
Scroll down to download your file under the Bulk spreadsheet history heading.
Step 2: Analyzing Your Sponsored Search Term Report
The heart of effective PPC management lies in understanding which search terms are driving conversions and which ones are burning through your ad budget.
To identify negative keywords, you’ll need to analyze your Sponsored Search Term Report. Here’s how:
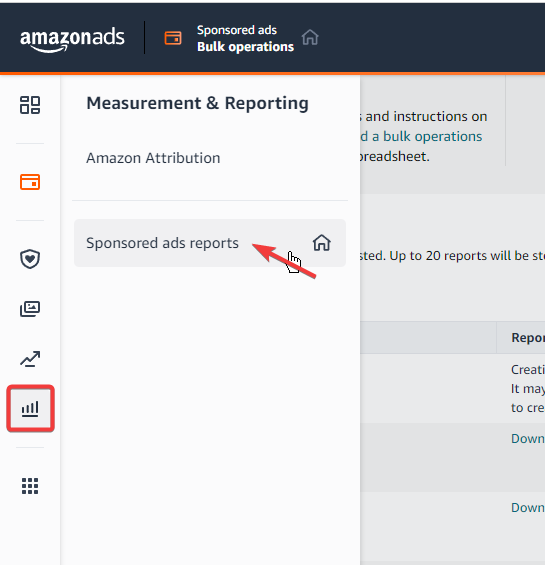
- In your Amazon Ads console, click the Measurement & Reporting icon and select Sponsored ads reports.
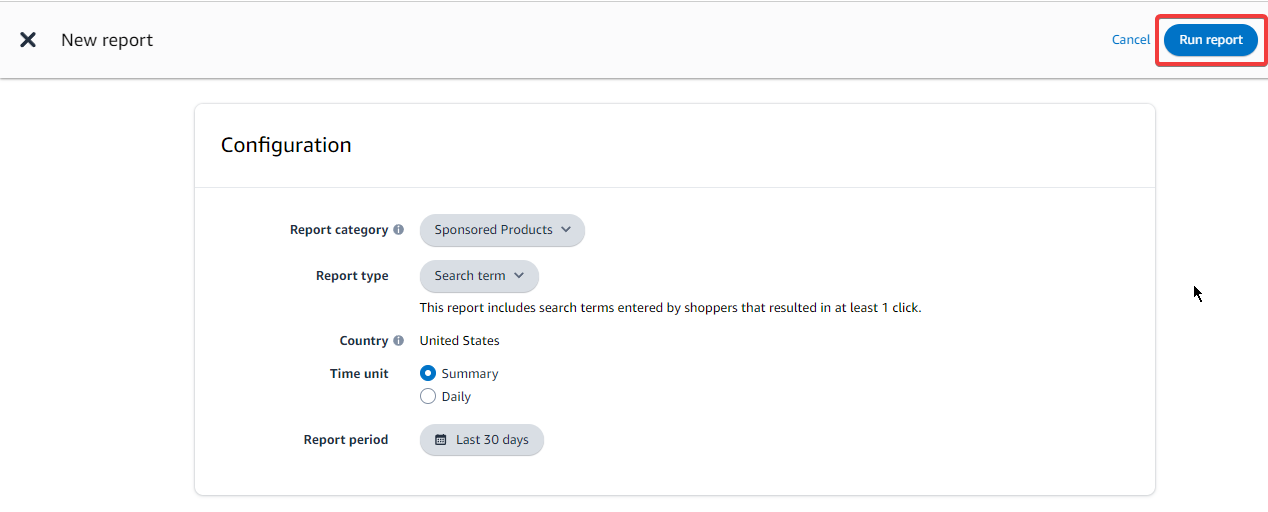
- Click the blue Create report button.
- Select Sponsored Products and Search term from the drop-down menus.
- Set the date range for your report to Last 30 days.
- Click the blue Run report button.
This report will provide a wealth of data, including the search terms that triggered your ads, the number of clicks, conversions, and more.
Your goal is to identify search terms that are not performing well and should be negated.
Step 3: Creating a Negative Keywords Template
Now that you’ve pinpointed the search terms you want to negate, it’s time to create a negative keywords template for Bulk Operations 2.0.
Lucky for you, we’ve provided a template that you can download and use. Grab it here – https://go.sellermetrics.app/V101

Here’s how to fill it out:
- Campaign ID – Copy this from your bulk file. Don’t see it? Make sure you’re on the right tab at the bottom of your spreadsheet. You should be on the Sponsored Products Campaigns tab.
- Ad Group ID – Copy from your Sponsored Products Search Term Report.
- State – Make sure it’s enabled.
- Campaign Name – Copy from your Sponsored Products Search Term Report.
- Keyword Text – Copy and paste in the keyword you want to negate.
- Match Type – 99% of the time this will be Negative Exact.
- Product Targeting Expression – Copy your ASIN from your Sponsored Products Search Term Report.
NOTE: Watch the video to see how I filter my files to find specific keywords and ASINs from my campaigns.
With your template ready, you’re poised to streamline the process of adding negative keywords to your campaigns.
Uploading Negative Keywords – Sponsored Products
Now that you have your negative keywords template ready, let’s delve into the process of uploading it specifically for sponsored products.
We’ll break down the template structure, guide you through filling in the essential fields, and even provide some examples for clarity.
Download your template from Google Docs:
- Click File, scroll down to Download and select Microsoft Excel from the fly-out menu.
Uploading the Template to Bulk Operations 2.0
You’ve got your file, now, let’s go upload it!
From your Amazon Ads console:
- Click the Sponsored ads icon and select Bulk operations.
- Click Choose file and upload your template.

Bulk Operations 2.0 will take care of the rest.
Verifying the Uploaded Negative Keywords – Sponsored Products
After you’ve uploaded your negative keywords using Bulk Operations 2.0 for your sponsored products campaigns, it’s essential to ensure that they’ve been successfully added at both the campaign and ad group levels.
This step is crucial for confirming that your ad spend is now protected from undesirable clicks and irrelevant searches.
Here’s how to verify that your negative keywords are in place:
Campaign Level Verification
From your Amazon Ads console:
- Click the Sponsored ads icon and select Campaign manager.
- Click the campaign in the list shown.
- Click Negative keywords to view the list of negative keywords applied to the campaign.

Here, you should see a list of all the keywords associated with your campaign. Your uploaded negative keywords should be listed here with a negative match type (exact or phrase). This confirms that your campaign level negations are active.
Ad Group Level Verification
From inside that same campaign:
- Select the Ad Group from the list.
- Click Negative targeting.

Similar to the campaign level, you should find your negative keywords listed here with the appropriate match type. This confirms that your ad group level negations are active.
Additional Verification Tips
- Double-check the spelling and formatting of your negative keywords in the campaign and ad group tabs. Even a minor error can prevent them from functioning correctly.
- Regularly monitor your ad campaigns and ad groups to ensure that your negative keywords are effectively preventing unwanted clicks and spend. Adjust your negative keyword list as needed based on campaign performance.
- Take advantage of Amazon’s reporting tools to track the impact of your negative keywords on your campaigns. This data can help you refine your negative keyword strategy over time.
By verifying the presence of your negative keywords at both the campaign and ad group levels, you can have confidence that you’ve successfully optimized your sponsored products campaigns to reduce ad spend on irrelevant searches.
Uploading Negative Keywords – Sponsored Brands
Now that you’ve mastered the process for sponsored products, let’s dive into applying negative keywords to your sponsored brands campaigns using Bulk Operations 2.0.
Sponsored brands provide an excellent opportunity to showcase your products and brand, but it’s equally important to ensure that your ad spend is directed towards the most relevant searches.
Negative keywords play a vital role in achieving this goal.
Template Structure for Sponsored Brands
The template structure for sponsored brands is quite similar to the one used for sponsored products.
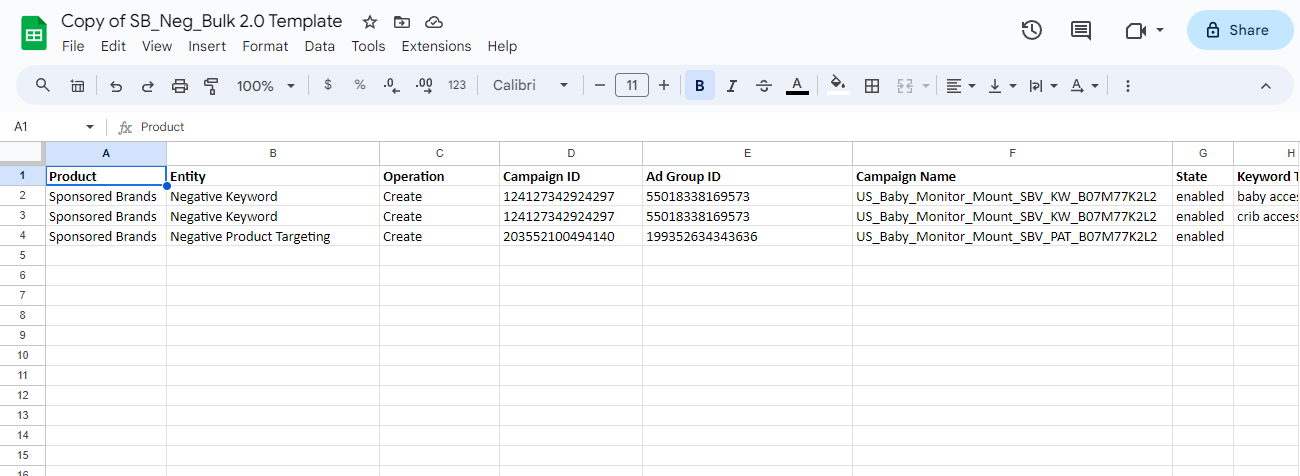
The template used here comes with the Sponsored Products template we used in the sections above.
Filling in the Required Fields
- Campaign ID – Pull this from your Bulk file you downloaded. You will find this information on the Sponsored Brands Campaigns tab at the bottom.
- Ad Group ID – Copy from your bulk file.
- Campaign Name – You find this on your Sponsored Products Search Terms report.
- State – Enabled.
- Keyword Text – Copy from your bulk file.
Once you’ve input your data, download the file as a Microsoft Excel file just as we did before.
Verifying the Uploaded Negative Keywords – Sponsored Brands
After you’ve uploaded your negative keywords for sponsored brands using Bulk Operations 2.0,verify that they’ve been added correctly at both the campaign and ad group levels.
From your Amazon Ads console:
- Click the Sponsored ads icon and select Bulk operations.
- Upload your Sponsored Brands Template Excel file.
You can only negate keywords on the Ad Group level for Sponsored Brands.
Ad Group Level Verification
From your Campaign manager in the Amazon Ads console:
- Click the Campaign in the list.
- Click the Ad Group.
- Click Negative targeting.
Under the Negative targeting section, you should see the negative keywords you uploaded listed there. T
Taking the time to regularly review and refine your negative keywords is essential for maintaining a well-optimized Amazon PPC campaign.
I recommend that you do this once per week, but at minimum once per month.
This ensures that your ads are shown to the most relevant audience, increasing the chances of higher click-through rates and conversions.
Bonus Tip – Using Automated Rules in Seller Metrics
While manually managing negative keywords and optimizations for your Amazon PPC campaigns is effective, there’s a time-saving alternative that can streamline the process even further – automated rules in Seller Metrics.
Let’s explore how this powerful feature can make your life as an Amazon seller even easier.
See it in action:
By leveraging automated rules in Seller Metrics, you can take your Amazon PPC management to the next level.
It’s a proactive approach that not only saves time but also helps you maintain highly efficient and effective advertising campaigns.
Parting Thoughts
In the fast-paced world of Amazon, where competition is fierce and every click counts, simplifying your PPC (Pay-Per-Click) advertising strategy can be the key to success.
Throughout this journey, we’ve explored the importance of streamlining your Amazon PPC campaigns, specifically through the strategic use of negative keywords.
The world of Amazon PPC is dynamic, and success often hinges on your ability to adapt and optimize.
We encourage all Amazon sellers to take action:
- Regularly review and update your negative keyword lists to keep them aligned with changing customer behaviors and market trends.
- Consider using Bulk Operations 2.0 and Seller Metrics’ automated rules to streamline your PPC management and save valuable time.
- Stay informed about the latest Amazon advertising trends and tools to stay ahead of the competition.
By implementing these strategies, you can refine your Amazon PPC campaigns, reduce wasteful ad spend, and drive more sales.
Remember, success on Amazon isn’t just about what you sell. It’s also about how effectively you reach your target audience. So, go ahead, simplify your Amazon PPC strategy, embrace the time-saving potential of Bulk Operations 2.0 and automation, and watch your Amazon business thrive.


![How to Use Broad Match and Modified Broad Match on Amazon? [The PPC Den Podcast]](https://reviewer4you.com/wp-content/uploads/2024/05/ep-Wordpress-Cover-3-336x220.png)

