Build Autonomous AI Agents with Function Calling | by Julian Yip | Apr, 2024
Transform your chatbot into an agent that can interact with external APIs
Function Calling is not something new. In July 2023, OpenAI introduced Function Calling for their GPT models, a feature now being adopted by competitors. Google’s Gemini API recently supported it, and Anthropic is integrating it into Claude. Function Calling is becoming essential for large language models (LLMs), enhancing their capabilities. All the more useful to learn this technique!
With this in mind, I aim to write a comprehensive tutorial covering Function Calling beyond basic introductions (there are already plenty of tutorials for it). The focus will be on practical implementation, building a fully autonomous AI agent and integrating it with Streamlit for a ChatGPT-like interface. Although OpenAI is used for demonstration, this tutorial can be easily adapted for other LLMs supporting Function Calling, such as Gemini.
Function Calling enables developers to describe functions (aka tools, you can consider this as actions for the model to take, like performing calculation, or making an order), and have the model intelligently choose to output a JSON object containing arguments to call those functions. In simpler terms, it allows for:
- Autonomous decision making: Models can intelligently choose tools to respond to questions.
- Reliable parsing: Responses are in JSON format, instead of the more typical dialogue-like response. It might not seem much from the first look, but this is what allows LLM to connect to external systems, say via APIs with structured inputs.
It opens up numerous possibilities:
- Autonomous AI assistants: Bots can interact with internal systems for tasks like customer orders and returns, beyond providing answers to enquiries
- Personal research assistants: Say if you are planning for your travel, assistants can search the web, crawl content, compare options, and summarize results in Excel.
- IoT voice commands: Models can control devices or suggest actions based on detected intents, such as adjusting the AC temperature.
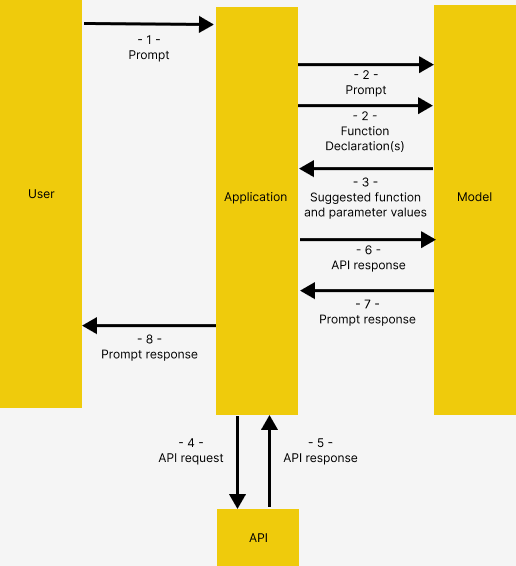
Borrowing from Gemini’s Function Calling documentation, Function Calling has the below structure, which works the same in OpenAI
- User issues prompt to the application
- Application passes the user-provided prompt, and the Function Declaration(s), which is a description of the tool(s) that the model could use
- Based on the Function Declaration, the model suggests the tool to use, and the relevant request parameters. Notice the model outputs the suggested tool and parameters only, WITHOUT actually calling the functions
- & 5. Based on the response, the application invokes the relevant API
6. & 7. The response from API is fed into the model again to output a human-readable response
8. Application returns the final response to the user, then repeat from 1.
This might seem convuluted, but the concept will be illustrated in detail with example
Before diving into the code, a few words about the demo application’s architecture
Solution
Here we build an assistant for tourists visiting a hotel. The assistant has access to the following tools, which allows the assistant to access external applications.
get_items,purchase_item: Connect to product catalog stored in database via API, for retrieving item list and making a purchase respectivelyrag_pipeline_func: Connect to document store with Retrieval Augmented Generation (RAG) to obtain information from unstructured texts e.g. hotel’s brochures

Tech stack
Now let’s begin!
Preparation
Head over to Github to clone my code. The contents below can be found in the function_calling_demo Notebook.
Please also create and activate a virtual environment, then pip install -r requirements.txt to install the required packages
Initialization
We first connect to OpenRouter. Alternatively using the original OpenAIChatGenerator without overwritting the api_base_urlwould also work, provided you have an OpenAI API key
import os
from dotenv import load_dotenv
from haystack.components.generators.chat import OpenAIChatGenerator
from haystack.utils import Secret
from haystack.dataclasses import ChatMessage
from haystack.components.generators.utils import print_streaming_chunk# Set your API key as environment variable before executing this
load_dotenv()
OPENROUTER_API_KEY = os.environ.get('OPENROUTER_API_KEY')
chat_generator = OpenAIChatGenerator(api_key=Secret.from_env_var("OPENROUTER_API_KEY"),
api_base_url="https://openrouter.ai/api/v1",
model="openai/gpt-4-turbo-preview",
streaming_callback=print_streaming_chunk)
Then we test can the chat_generator be successfully invoked
chat_generator.run(messages=[ChatMessage.from_user("Return this text: 'test'")])
---------- The response should look like this ----------
{'replies': [ChatMessage(content="'test'", role=<ChatRole.ASSISTANT: 'assistant'>, name=None, meta={'model': 'openai/gpt-4-turbo-preview', 'index': 0, 'finish_reason': 'stop', 'usage': {}})]}
Step 1: Establish data store
Here we establish connection between our application and the two data sources: Document store for unstructured texts, and application database via API
Index Documents with a Pipeline
We provide sample texts in documents for the model to perform Retrival Augmented Generation (RAG). The texts are turned into embeddings and stored in an in-memory document store
from haystack import Pipeline, Document
from haystack.document_stores.in_memory import InMemoryDocumentStore
from haystack.components.writers import DocumentWriter
from haystack.components.embedders import SentenceTransformersDocumentEmbedder# Sample documents
documents = [
Document(content="Coffee shop opens at 9am and closes at 5pm."),
Document(content="Gym room opens at 6am and closes at 10pm.")
]
# Create the document store
document_store = InMemoryDocumentStore()
# Create a pipeline to turn the texts into embeddings and store them in the document store
indexing_pipeline = Pipeline()
indexing_pipeline.add_component(
"doc_embedder", SentenceTransformersDocumentEmbedder(model="sentence-transformers/all-MiniLM-L6-v2")
)
indexing_pipeline.add_component("doc_writer", DocumentWriter(document_store=document_store))
indexing_pipeline.connect("doc_embedder.documents", "doc_writer.documents")
indexing_pipeline.run({"doc_embedder": {"documents": documents}})
It should output this, corresponding to the documents we created as sample
{'doc_writer': {'documents_written': 2}}
Spin up API server
An API server made with Flask is created under db_api.py to connect to SQLite. Please spin it up by running python db_api.py in your terminal

Also notice that some initial data has been added in db_api.py

Step 2: Define the functions
Here we prepare the actual functions for the model to invoke AFTER Function Calling (Step 4–5 as described in The Structure of Function Calling)
RAG function
Namely the rag_pipeline_func. This is for the model to provide an answer by searching through the texts stored in the Document Store. We first define the RAG retrieval as a Haystack pipeline
from haystack.components.embedders import SentenceTransformersTextEmbedder
from haystack.components.retrievers.in_memory import InMemoryEmbeddingRetriever
from haystack.components.builders import PromptBuilder
from haystack.components.generators import OpenAIGeneratortemplate = """
Answer the questions based on the given context.
Context:
{% for document in documents %}
{{ document.content }}
{% endfor %}
Question: {{ question }}
Answer:
"""
rag_pipe = Pipeline()
rag_pipe.add_component("embedder", SentenceTransformersTextEmbedder(model="sentence-transformers/all-MiniLM-L6-v2"))
rag_pipe.add_component("retriever", InMemoryEmbeddingRetriever(document_store=document_store))
rag_pipe.add_component("prompt_builder", PromptBuilder(template=template))
# Note to llm: We are using OpenAIGenerator, not the OpenAIChatGenerator, because the latter only accepts List[str] as input and cannot accept prompt_builder's str output
rag_pipe.add_component("llm", OpenAIGenerator(api_key=Secret.from_env_var("OPENROUTER_API_KEY"),
api_base_url="https://openrouter.ai/api/v1",
model="openai/gpt-4-turbo-preview"))
rag_pipe.connect("embedder.embedding", "retriever.query_embedding")
rag_pipe.connect("retriever", "prompt_builder.documents")
rag_pipe.connect("prompt_builder", "llm")
Test if the function works
query = “When does the coffee shop open?”
rag_pipe.run({"embedder": {"text": query}, "prompt_builder": {"question": query}})
This should yield the following output. Notice the replies that the model gave is from the sample documents we provided before
{'llm': {'replies': ['The coffee shop opens at 9am.'],
'meta': [{'model': 'openai/gpt-4-turbo-preview',
'index': 0,
'finish_reason': 'stop',
'usage': {'completion_tokens': 9,
'prompt_tokens': 60,
'total_tokens': 69,
'total_cost': 0.00087}}]}}
We can then turn the rag_pipe into a function, which provides the replies only without adding in the other details
def rag_pipeline_func(query: str):
result = rag_pipe.run({"embedder": {"text": query}, "prompt_builder": {"question": query}})return {"reply": result["llm"]["replies"][0]}
API calls
We define the get_items and purchase_itemfunctions for interacting with the database
# Flask's default local URL, change it if necessary
db_base_url = 'http://127.0.0.1:5000'# Use requests to get the data from the database
import requests
import json
# get_categories is supplied as part of the prompt, it is not used as a tool
def get_categories():
response = requests.get(f'{db_base_url}/category')
data = response.json()
return data
def get_items(ids=None,categories=None):
params = {
'id': ids,
'category': categories,
}
response = requests.get(f'{db_base_url}/item', params=params)
data = response.json()
return data
def purchase_item(id,quantity):
headers = {
'Content-type':'application/json',
'Accept':'application/json'
}
data = {
'id': id,
'quantity': quantity,
}
response = requests.post(f'{db_base_url}/item/purchase', json=data, headers=headers)
return response.json()
Define the tool list
Now that we have defined the fuctions, we need to let the model recognize those functions, and to instruct them how they are used, by providing descriptions for them.
Since we are using OpenAI here, the tools is formatted as below following the format required by Open AI
tools = [
{
"type": "function",
"function": {
"name": "get_items",
"description": "Get a list of items from the database",
"parameters": {
"type": "object",
"properties": {
"ids": {
"type": "string",
"description": "Comma separated list of item ids to fetch",
},
"categories": {
"type": "string",
"description": "Comma separated list of item categories to fetch",
},
},
"required": [],
},
}
},
{
"type": "function",
"function": {
"name": "purchase_item",
"description": "Purchase a particular item",
"parameters": {
"type": "object",
"properties": {
"id": {
"type": "string",
"description": "The given product ID, product name is not accepted here. Please obtain the product ID from the database first.",
},
"quantity": {
"type": "integer",
"description": "Number of items to purchase",
},
},
"required": [],
},
}
},
{
"type": "function",
"function": {
"name": "rag_pipeline_func",
"description": "Get information from hotel brochure",
"parameters": {
"type": "object",
"properties": {
"query": {
"type": "string",
"description": "The query to use in the search. Infer this from the user's message. It should be a question or a statement",
}
},
"required": ["query"],
},
},
}
]
Step 3: Putting it all together
We now have the necessary inputs to test Function Calling! Here we do a few things:
- Provide the initial prompt to the model, to give it some context
- Provide a sample user-generated message
- Most importantly, we pass the tool list to the chat generator in
tools
# 1. Initial prompt
context = f"""You are an assistant to tourists visiting a hotel.
You have access to a database of items (which includes {get_categories()}) that tourists can buy, you also have access to the hotel's brochure.
If the tourist's question cannot be answered from the database, you can refer to the brochure.
If the tourist's question cannot be answered from the brochure, you can ask the tourist to ask the hotel staff.
"""
messages = [
ChatMessage.from_system(context),
# 2. Sample message from user
ChatMessage.from_user("Can I buy a coffee?"),
]# 3. Passing the tools list and invoke the chat generator
response = chat_generator.run(messages=messages, generation_kwargs= {"tools": tools})
response
---------- Response ----------
{'replies': [ChatMessage(content='[{"index": 0, "id": "call_AkTWoiJzx5uJSgKW0WAI1yBB", "function": {"arguments": "{\\"categories\\":\\"Food and beverages\\"}", "name": "get_items"}, "type": "function"}]', role=<ChatRole.ASSISTANT: 'assistant'>, name=None, meta={'model': 'openai/gpt-4-turbo-preview', 'index': 0, 'finish_reason': 'tool_calls', 'usage': {}})]}
Now let’s inspect the response. Notice how the Function Calling returns both the function chosen by the model, and the arguments for invoking the chosen function.
function_call = json.loads(response["replies"][0].content)[0]
function_name = function_call["function"]["name"]
function_args = json.loads(function_call["function"]["arguments"])
print("Function Name:", function_name)
print("Function Arguments:", function_args)
---------- Response ----------
Function Name: get_items
Function Arguments: {‘categories’: ‘Food and beverages’}
When presented with another question, the model will use another tool that is more relevant
# Another question
messages.append(ChatMessage.from_user("Where's the coffee shop?"))# Invoke the chat generator, and passing the tools list
response = chat_generator.run(messages=messages, generation_kwargs= {"tools": tools})
function_call = json.loads(response["replies"][0].content)[0]
function_name = function_call["function"]["name"]
function_args = json.loads(function_call["function"]["arguments"])
print("Function Name:", function_name)
print("Function Arguments:", function_args)
---------- Response ----------
Function Name: rag_pipeline_func
Function Arguments: {'query': "Where's the coffee shop?"}
Again, notice that no actual function is invoked here, this is what we will do next!
Calling the function
We can then feed the arguments into the chosen function
## Find the correspoding function and call it with the given arguments
available_functions = {"get_items": get_items, "purchase_item": purchase_item,"rag_pipeline_func": rag_pipeline_func}
function_to_call = available_functions[function_name]
function_response = function_to_call(**function_args)
print("Function Response:", function_response)
---------- Response ----------
Function Response: {'reply': 'The provided context does not specify a physical location for the coffee shop, only its operating hours. Therefore, I cannot determine where the coffee shop is located based on the given information.'}
The response from rag_pipeline_func can then passed as a context to the chat by appending it under the messages, for the model to provide the final answer
messages.append(ChatMessage.from_function(content=json.dumps(function_response), name=function_name))
response = chat_generator.run(messages=messages)
response_msg = response["replies"][0]print(response_msg.content)
---------- Response ----------
For the location of the coffee shop within the hotel, I recommend asking the hotel staff directly. They will be able to guide you to it accurately.
We now have completed the chat cycle!
Step 4: Turn into an interactive chat
The code above shows how Function Calling can be done, but we want to go a step further by turning it into an interactive chat
Here I showcase two methods to do it, from the more primitive input() that prints the dialogue into the notebook itself, to rendering it through Streamlit to provide it with an ChatGPT-like UI
input() loop
The code is copied from Haystack’s tutorial, which allows us to quickly test the model. Note: This application is created to demonstrate the idea of Function Calling, and is NOT meant to be perfectly robust e.g. supporting the order of multiple items at the same time, no hallucination, etc.
import json
from haystack.dataclasses import ChatMessage, ChatRoleresponse = None
messages = [
ChatMessage.from_system(context)
]
while True:
# if OpenAI response is a tool call
if response and response["replies"][0].meta["finish_reason"] == "tool_calls":
function_calls = json.loads(response["replies"][0].content)
for function_call in function_calls:
## Parse function calling information
function_name = function_call["function"]["name"]
function_args = json.loads(function_call["function"]["arguments"])
## Find the correspoding function and call it with the given arguments
function_to_call = available_functions[function_name]
function_response = function_to_call(**function_args)
## Append function response to the messages list using `ChatMessage.from_function`
messages.append(ChatMessage.from_function(content=json.dumps(function_response), name=function_name))
# Regular Conversation
else:
# Append assistant messages to the messages list
if not messages[-1].is_from(ChatRole.SYSTEM):
messages.append(response["replies"][0])
user_input = input("ENTER YOUR MESSAGE 👇 INFO: Type 'exit' or 'quit' to stop\n")
if user_input.lower() == "exit" or user_input.lower() == "quit":
break
else:
messages.append(ChatMessage.from_user(user_input))
response = chat_generator.run(messages=messages, generation_kwargs={"tools": tools})

While it works, we might want to have something that looks nicer.
Streamlit interface
Streamlit turns data scripts into shareable web apps, which provides a neat UI for our application. The code shown above are adapted into a Streamlit application under the streamlit folder of my repo
You can run it by:
- If you have not done so already, spin up the API server with
python db_api.py - Set the OPENROUTER_API_KEY as environment variable e.g.
export OPENROUTER_API_KEY = ‘@REPLACE WITH YOUR API KEY’assuming you are on Linux / executing with git bash - Navigate to the
streamlitfolder in the terminal withcd streamlit - Run Streamlit with
streamlit run app.py. A new tab should be automatically created in your browser running the application
That’s basically it! I hope you enjoy this article.

*Unless otherwise noted, all images are by the author


