What’s the use of having a groundbreaking product with optimized images if it doesn’t fall on page 1 of a product search on Amazon?
Everyone knows the importance of advertising in any business, yet some are hesitant to spend money on it. Among the different types of ad campaigns you can run on Amazon, one of the easiest and most cost-effective strategies out there is a catch-all campaign.
In this article, we’ll discuss what a catch-all campaign is, how to set it up, and tips to help you make the most out of your ad budget on Amazon.
What Is an Amazon Catch-All Campaign?
A catch-all campaign is an advertising strategy that utilizes low bids to target a broader set of keywords, search terms, and audience segments. This strategy casts a wider net on your inventory than other campaigns, making it an indispensable tool for expanding your product’s visibility.
The best part about catch-all campaigns is that you don’t need to spend too much time optimizing them compared to, say, Amazon DSP, since it operates on a low bid and includes search queries that you necessarily don’t want to spend money on for manual campaigns.
This type of campaign also ensures that customers can see your products throughout the day and even have the chance to rise to the top of a search when Amazon has used up most of the daily ad budget from other businesses.
How to Create a Catch-All Campaign
Creating a catch-all campaign is a low-budget, high-return strategy that requires only a few steps to complete. Read on below as we discuss the step-by-step process of setting up this campaign.
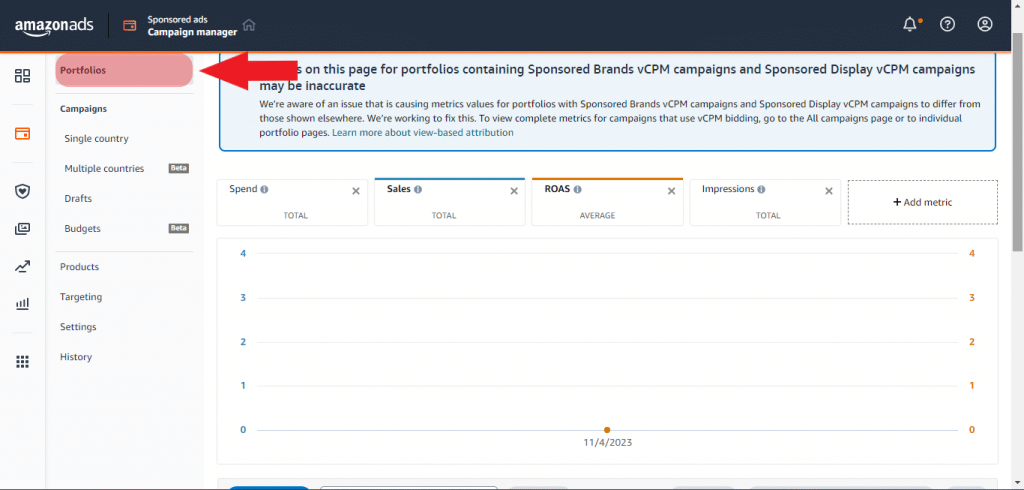
Step 1: Create a portfolio for your catch all campaigns
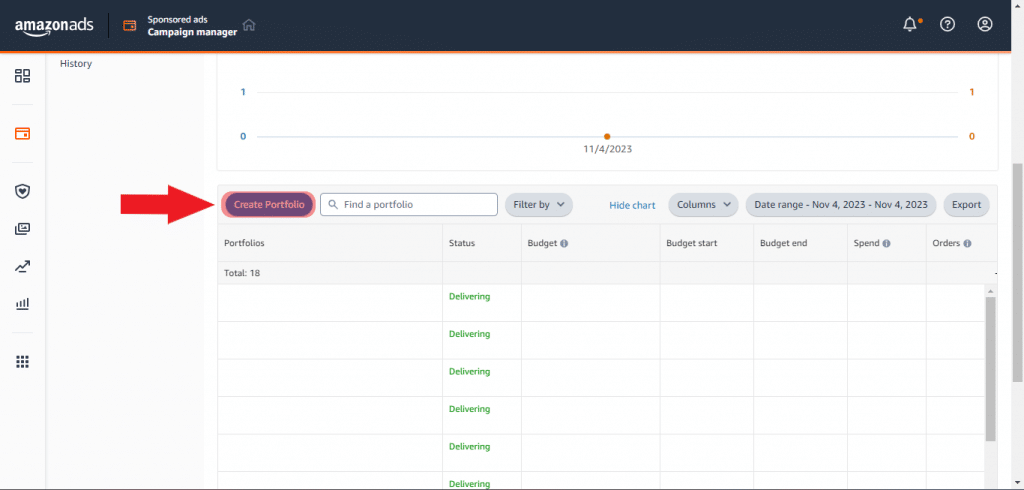
When you’re on Amazon’s campaign manager page, click on Portfolios > create Portfolio > name the Portfolio Catch All. Of course, you are free to name the portfolio however you want to help you distinguish your campaigns.


By having a dedicated folder for your ccatch all campaigns, it becomes easier for you to track its performance and keep you organized.
Step 2: Split your campaign into different match types
As another measure to keep your campaigns organized, it’s best you also create separate campaigns for your different match types for targeting customer searches, namely:
Close match
This keyword targeting option is when Amazon targets your ads to shoppers who are searching for products closely related to the keywords you have on your listing.
For example, if you sell soccer shoes for women, your ad will be displayed when someone searches for women’s soccer shoes and soccer shoes.
Loose match
Similar to close match, loose match keywords will show your products when they somewhat relate to the product you are selling.
Let’s say you’re selling wireless earphones on Amazon, turning on loose match keywords targeting will show your products when a shopper is searching for Buetooth earphones, wireless headphones, and wireless earphones for the gym.
Complements
This type of targeting feature will show your listing to products that work well or are related to your offering.
Say your product is an outdoor camping tent. When you turn on complements, Amazon will also show your ad when shoppers search for outdoor lanterns, sleeping bags, and waterproof backpacks.
Substitutes
When you want to target your competitor’s brand, this targeting feature can get the job done. Substitutes are a way to place your products in front of customers who are considering similar options.
If you sell basketball shoes, there’s a good chance your product will be shown when someone searches for Nike basketball shoes or even outdoor shoes.
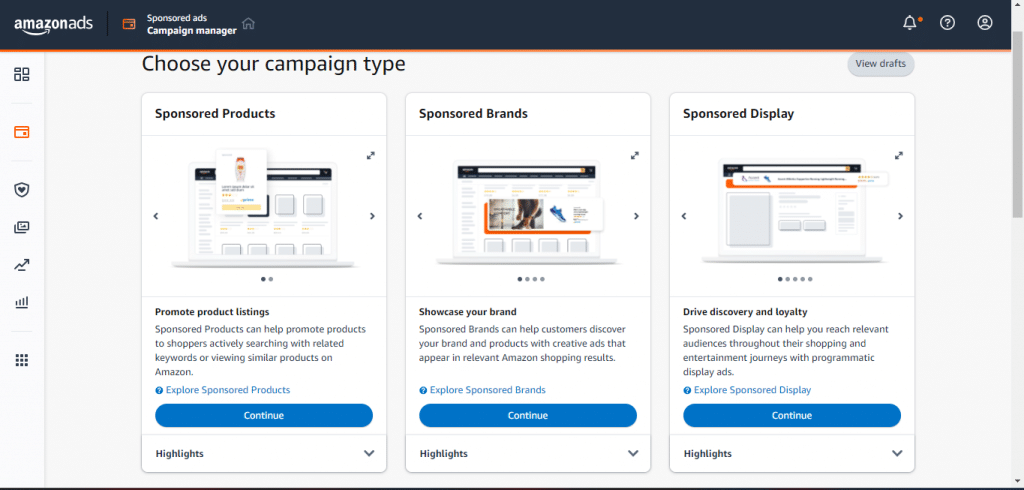
Step 3: Choose your campaign type
Now that you have a dedicated portfolio and segregated your different targeting options, you’re ready to start making your first catch-all campaign.
The first thing you’ll need to do is determine how Amazon will show your ads, depending on your keyword targeting. This part shouldn’t be an issue since this has been explained in the previous section.
Next, it’s time to create a campaign. Since we’ll be leveraging different keywords, the best campaign to use is a Sponsored Product campaign, especially if you use a close match or loose match as your way of targeting.
In our example, we’ll be setting up a catch all auto close match campaign.

For complements and substitutes, you can also use Sponsored Display ads as your campaign type.
Step 4: Select the products you want to include in your ad
Once you’ve clicked on Sponsored Products, you’ll be redirected to the Ad Group page. This is where you’ll name your ad group and choose the products you want to be shown on your catch all campaign.
When naming your ad group and campaign name, it’s best to name it depending on the catch all campaign you’ll be running. In this example, the name of the ad group is Catch All Auto CM (close match).

After selecting your campaign type, you will be sent to a page where you’ll set up the rest of your ad.
Since catch-all campaigns are ideal for brands with large catalogs, it’s best that you add in all of your products. However, if you sell more than 100 products, you can segregate them into categories that consist of 30 to 50 items per campaign.
For example, if your niche is selling cell phones, then you can sort your products by chargers, brands, accessories, etc.
Step 5: Choose the right targeting
In the targeting portion as you set up your campaign, you have two options: automatic and manual targeting. Since our campaign is an auto campaign, set your targeting to Automatic targeting. By doing this, Amazon will be in charge of targeting keywords and products where your ad will be shown.
In automatic targeting, this is where you’ll choose your default bid. You’re free to choose your bid but Amazon does also suggest a default bid if you’re uncertain that your bid is too high or too low.
For negative keyword and product targeting, it’s best to also leave this portion blank unless you’re confident that there’s a 0% chance customers will purchase your product when they search for that particular product or keyword.
Step 6: Set your default bid under a dollar
Catch all campaigns are intended to act as a supplement to your other ads on Amazon. If you set your budget too high, you’ll end up spending more than what you intended.
Step 7: Leave your campaign running
Before you launch your campaign, don’t forget to leave the end date of your catch all campaigns blank.
To measure the success of your catch all campaigns, aim for a return on ad spend (ROAS) of 10% to 15%. Getting around this rate can be difficult since it’s a broad type of campaign with a lower bid, but Mike explained how it can be easily achieved in one of our modules on PPC & Ads.
Tips for Making an Effective Catch-All Campaign
Even though catch all campaigns won’t cause a huge dent in your overall ad budget, it’s important to look at some of the things you can do to increase the success of your campaign.
Split your campaigns into groups or categories
As we mentioned earlier, when your business sells over 100 products, split the products into groups or categories, regardless if your campaign is a close match, loose match, complements, or substitutes.
The last thing you want to happen is when your product is shown on a product search that is irrelevant to what you’re trying to sell.
Dayparting
Dayparting is a strategy where you adjust your bids so that your ads will only be shown at specific hours of the day. This minimizes your cost while maximizing your product’s exposure.
While it usually depends on when your customers are active on Amazon, a dayparting strategy you can use to maximize sales is to schedule your ads later in the day. The concept behind this is that since most of your competitors have worn out their daily budget by then, it won’t cost as much to have your products shown on search compared to earlier in the day.
Only turn on one targeting group on every catch all campaign
By default, Amazon will turn on your other targeting groups when you choose to set a default bid on Automatic Targeting.
When you click on set bids by targeting group, it will show the other targeting groups. Depending on the type of catch all campaign you’ll set up, be sure to only turn on one targeting group at a time to maximize your budget and generate the best data.
Set your campaign bidding strategy to Dynamic bids – down only
The main goal of a catch all campaign is to get orders while spending as little money as possible on ads. By setting your bidding strategy to down only, Amazon will automatically decrease your bid when it’s less likely to make a sale.
Benefits of Catch-All Campaigns
Aside from optimized bidding to produce sales and limited monitoring, catch all campaigns can provide multiple benefits to any business on Amazon.
Increased Visibility
One of the benefits of broadening the keywords and search terms in your ad is the possibility of increasing your brand’s exposure. A vital component for startup brands to increase awareness.
With catch all campaigns your products will be shown in search results and related products which leads to more users seeing your brand on Amazon.
Discover new keywords
By bidding on as many keywords as possible, you can discover new keywords that customers use to search for your products that you would’ve never realized.
This can help you make sound decisions when targeting a more specific audience in future campaigns.
Conclusion
In the end, you’ll never know how successful your ads are if you don’t allocate funds to testing. Even if a strategy could work for 99% of Amazon sellers, there’s still a chance that your business could fall in the 1% bucket.
As Amazon continues to make more revenue from advertising, it’s no surprise that the platform will continue to mix up its algorithm to try and get sellers to spend more for advertising.
The good news with catch all campaigns is that your bid can be as low as $.20 and still see decent results on your ROAS.
Have you tried using catch all campaigns to advertise on Amazon? Share your thoughts in the comments below.
Discover more from reviewer4you.com
Subscribe to get the latest posts to your email.


